install.packages("dplyr")14 Reproducible analytical pipelines with Docker
If the book ended at the end of the previous chapter, it would have been titled “Building analytical pipelines with R”, because we have not ensured that the pipeline we built is reproducible. We did our best though:
- we used functional and literate programming;
- we documented, tested and versioned the code;
- we used
{renv}to record the dependencies of the project; - the project was rewritten as a
{targets}pipeline and re-running it is as easy as it can possibly get.
But there are still many variables that we need to consider. If we go back to the reproducibility iceberg, you will notice that we can still go deeper. As the code stands now, we did our best using programming paradigms and libraries, but now we need to consider other aspects.
As already mentioned in the introduction and Chapter 10, {renv} only restores package versions. The R version used for the analysis only gets recorded. So to make sure that the pipeline reproduces the same results, you’d need to install the same R version that was used to build the pipeline originally. But installing the right R version can be difficult sometimes; it depends on the operating system you want to install it on, and how old a version we’re talking about. Installing R 4.0 on Windows should be quite easy, but I wouldn’t be very keen on trying to install R 2.15.0 (released on March 2012) on a current Linux distribution (and it might be problematic even on Windows as well).
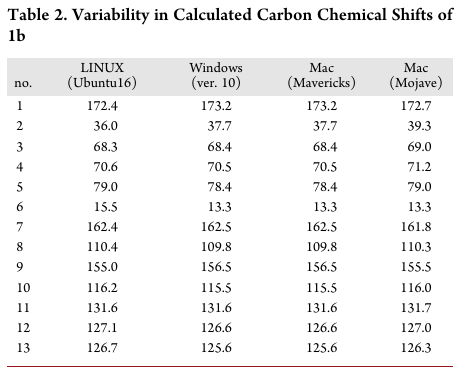
Next comes the operating system on which the pipeline was developed. In practice, this rarely matters, but there have been cases where the same code produced different results on different operating systems, sometimes even on different versions of the same operating system! For example, Bhandari Neupane et al. (2019) discuss their attempt at reproducing a paper from 2014. The original scripts and data were available, and yet they were not able to reproduce the results, even though they made sure to use the same version of Python that the original authors from 2014 were using. The reason was the operating system: they were conducting their replication exercise on a different operating system, and this was causing the results to be different. What was going on? The original script relied on how the operating system ordered the files for analysis. If the files were ordered in a different way, the results would be different. And file ordering is operating system dependent! The table below, from Bhandari Neupane et al. (2019), shows how the results vary depending on which operating system the script runs:
and this table shows how Windows and Ubuntu (Linux) sort files:
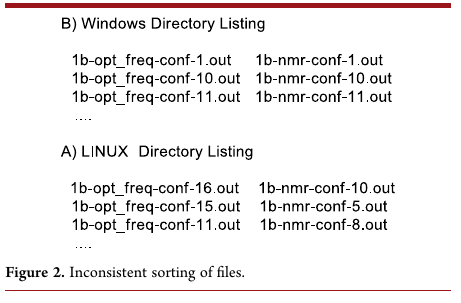
So the operating system can have an impact, and often an unexpected impact, on our pipeline!
And finally, I believe that we are in a transition period when it comes to hardware architecture. Apple will very likely completely switch over to an ARM architecture with their Apple silicon CPUs (as of writing, the Mac Pro is the only computer manufactured by Apple that doesn’t use an Apple silicon CPU and only because it was released in 2019) and it wouldn’t surprise me if other manufacturers follow suit and develop their own ARM cpus. This means that projects written today may not run anymore in the future, because of these architecture changes. Libraries compiled for current architectures would need to be recompiled for ARM, and that may be difficult.
So, as I explained in the previous chapter, we want our pipeline to be the composition of pure functions. Nothing in the global environment (apart from {target}-specific options) should influence the runs of the pipeline. But, what about the environment R is running in? The R engine is itself running in some kind of environment. This is what I’ve explained above: operating system (and all the math libraries that are included in the OS that R relies on to run code) and hardware are variables that need to be recorded and/or frozen as much as possible.
Think about it this way: when you running a pure function f() of one argument you think you do this:
f(1)but actually what you’re doing is:
f(1, "windows 10 - build 22H2 - patch 10.0.19045.2075",
  "intel x86_64 cpu i9-13900F",
  "R version 4.2.2")
and so on. f() is only pure as far as the R version currently running f() is concerned. But everything else should also be taken into account! Remember, in technical terms, this means that our function is not referentially transparent. This is exactly what happened in the paper from Bhandari Neupane et al. (2019) that I described before. The authors relied on a hidden state (the order of the files) to program their script; in other words, their pipeline was not referentially transparent.
To deal with this, I will now teach you how to use Docker. Docker will essentially allow you to turn your pipeline referentially transparent, by freezing R’s and the operating system’s versions (and the CPU architecture as well).
Before continuing, let me warn you: if you’re using an Apple computer with an Apple Silicon CPU (M1 or M2), then you may have issues following along. I don’t own such a machine so I cannot test if the code below works flawlessly. What I can say is that I’ve read some users of these computers have had trouble using Docker in the past. These issues might have been solved in the meantime. It seems that enabling the option “use Rosetta for x86/amd64 emulation on Apple Silicon” in Docker Desktop (I will discuss Docker Desktop briefly in the following sections) may solve the issue.
14.1 What is Docker?
Let me first explain in very simple terms what Docker is.
In very simple (and technically wrong) terms, Docker makes it easy to run a Linux virtual machine (VM) on your computer. A VM is a computer within a computer: the idea is that you turn on your computer, start Windows (the operating system you use every day), but then start Ubuntu (a very popular Linux distribution) as if it were any other app installed on your computer and use it (almost) as you would normally. This is what a classic VM solution like Virtualbox offers you. You can start and use Ubuntu interactively from within Windows. This can be quite useful for testing purposes for example.
The way Docker differs from Virtualbox (or VMware) is that it strips down the VM to its bare essentials. There’s no graphical user interface for example, and you will not (typically) use a Docker VM interactively. What you will do instead is write down in a text file the specifications of the VM you want. Let’s call this text file a Dockerfile. For example, you want the VM to be based on Ubuntu. So that would be the first line in the Dockerfile. You then want it to have R installed. So that would be the second line. Then you need to install R packages, so you add those lines as well. Maybe you need to add some system dependencies? Add them. Finally, you add the code of the pipeline that you want to make reproducible as well.
Once you’re done, you have this text file, the Dockerfile, with a complete recipe to generate a Docker VM. That VM is called an image (as I said previously it’s technically not a true VM, but let’s not discuss this). So you have a text file, and this file helps you define and generate an image. Here, you should already see a first advantage of using Docker over a more traditional VM solution like Virtualbox: you can very easily write these Dockerfiles and version them. You can easily start off from another Dockerfile from another project and adapt it to your current pipeline. And most importantly, because everything is written down, it’s reproducible (but more on that at the end of this chapter…).
Ok, so you have this image. This image will be based on some Linux distribution, very often Ubuntu. It comes with a specific version of Ubuntu, and you can add to it a specific version of R. You can also download a specific version of all the packages required for your pipeline. You end up with an environment that is tailor-made for your pipeline. You can then run the pipeline with this Docker image, and always get exactly the same results, ever. This is because, regardless of how, where or when you will run this dockerized pipeline, the same version of R, with the same version of R packages, on the same Linux distribution will be used to reproduce the results of your pipeline. By the way, when you run a Docker image, as in, you’re executing your pipeline using that image definition, this now is referred to as a Docker container.
So: a Dockerfile defines a Docker image, from which you can then run containers. I hope that the pictures below will help. The first picture shows what happens when you run the same pipeline on two different R versions and two different operating systems:
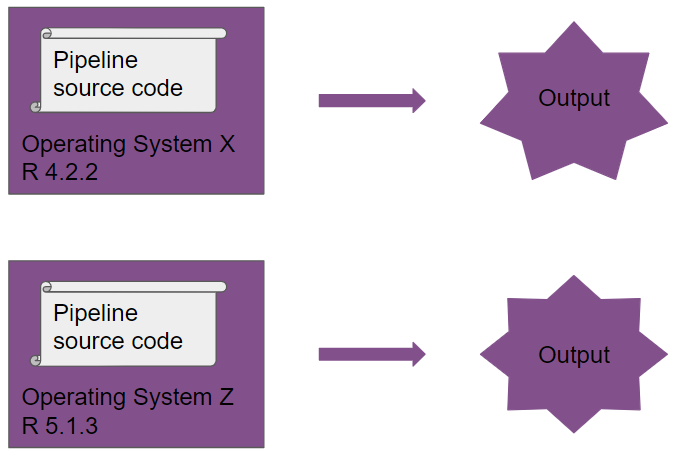
Take a close look at the output, you will notice it’s different!
Now, you run the same pipeline, which is now dockerized:

Another way of looking at a Docker image: it’s an immutable sandbox, where the rules of the game are always the same. It doesn’t matter where or when you run this sandbox, the pipeline will always be executed in this same, well-defined space. Because the pipeline runs on the same versions of R (and packages) and on the same operating system defined within the Docker image, our pipeline is now truly reproducible.
But why Linux though; why isn’t it possible to create Docker images based on Windows or macOS? Remember in the introduction, where I explained what reproducibility is? I wrote:
Open source is a hard requirement for reproducibility.
Open source is not just a requirement for the programming language used for building the pipeline but extends to the operating system that the pipeline runs on as well. So the reason Docker uses Linux is because you can use Linux distributions like Ubuntu for free and without restrictions. There aren’t any licenses that you need to buy or activate, and Linux distributions can be customized for any use case imaginable. Thus Linux distributions are the only option available to Docker for this task.
14.2 A primer on Linux
Up until this point, you could have followed along using any operating system. Most of the code shown in this book is R code, so it doesn’t matter on what operating system you’re running it. But there was some code that I ran in the Linux console (for example, I’ve used ls to list files). These commands should also work on macOS, but on Windows, I told you to run them in the Git Bash terminal instead. This is because ls (and other such commands) don’t work in the default Windows command prompt (but should work in Powershell though). Instead of using the terminal (or Git Bash) to navigate your computer’s file system, you could have followed along using the user interface of your operating system as well. For example, in Chapter 11, I list the contents of the dev/ directory using the following command:
owner@localhost ➤ ls dev/but you could have just opened the dev/ folder in the file explorer of your operating system of choice. But to use Docker, you will need to get to know Linux and the Linux ecosystem and concepts a little bit. No worries, it’s not as difficult as it sounds, and I think that you likely aren’t afraid of difficult things, or else you would have stopped reading this book much earlier.
Linux is not the name of any one specific operating system, but of an operating system kernel. A kernel is an important component of an operating system. Linux is free and open-source, and among the most successful free and open source projects ever. Because it’s license allows (and encourages) re-use, anyone can take that kernel, and add all the other components needed to build a complete operating system and release the finished product. This is why there are many Linux distributions: a Linux distribution is a complete operating system that uses Linux as its kernel. The most popular Linux distribution is called Ubuntu, and if one time you googled something along the lines of “easy linux os for beginners” the answer that came out on top was likely Ubuntu, or one of the other variants of Ubuntu (yes, because Ubuntu itself is also open-source and free software, it is possible to build a variant using Ubuntu as a basis, like Linux Mint).
To define our Docker images, we will be using Ubuntu as a base. The Ubuntu operating system has two releases a year, one in April and one in October. On even years, the April release is a long-term support (LTS) release. LTS releases get security updates for 5 years, and Docker images generally use an LTS release as a base. As of writing (May 2023), the current LTS is Ubuntu 22.04 Jammy Jellyfish (Ubuntu releases are named with a number of the form YY.MM and then a code name based on some animal).
If you want, you can install Ubuntu on your computer. But there’s no need for this, since you can use Docker to ship your projects!
A major difference between Ubuntu (and other Linux distributions) and macOS and Windows is how you install software. In short, software for Linux distributions is distributed as packages. If you want to install, say, the Emacs text editor, you can run the following command in the terminal:
sudo apt-get install emacs-gtkLet’s break this down: sudo makes the next commands run as root. root is Linux jargon for the administrator account. So if I type sudo xyz, the command xyz will run with administrator privileges. Then comes apt-get install. apt-get is Ubuntu’s package manager, and install is the command that installs emacs-gtk. emacs-gtk is the name of the Emacs package. Because you’re an R user, this should be somewhat familiar: after all, extensions for R are also installed using a package manager and a command: install.packages("package_name"). Just like in R, where the packages get downloaded from CRAN, Ubuntu downloads packages from a repository which you can browse here1. Of course, because using the command line is intimidating for beginners, it is also possible to install packages using a software store, just like on macOS or Windows. But remember, Docker only uses what it absolutely needs to function, so there’s no interactive user interface. This is not because Docker’s developers don’t like user interfaces, but because the point of Docker is not to use Docker images interactively, so there’s no need for the user interface. So you need to know how to install Ubuntu packages with the command line.
Just like for R, it is possible to install software from different sources. It is possible to add different repositories, and install software from there. We are not going to use this here, but just as an aside, if you are using Ubuntu on your computer as your daily driver operating system, you really should check out r2u2, an Ubuntu repository that comes with pre-compiled R packages that can get installed, very, very quickly. Even though we will not be using this here (and I’ll explain why later in this chapter), you should definitely consider r2u to provide binary R packages if you use Ubuntu as your daily operating system.
Let’s suppose that you are using Ubuntu on your machine, and are using R. If you want to install the {dplyr} R package, something interesting happens when you type:
On Windows and macOS, a compiled binary gets downloaded from CRAN and installed on your computer. A “binary” is the compiled source code of the package. Many R packages come with C++ or Fortran code, and this code cannot be used as is by R. So these bits of C++ and Fortran code need to be compiled to be used. Think of it this way: if the source code is the ingredients of a recipe, the compiled binary is the cooked meal. Now imagine that each time you want to eat Bouillabaisse, you have to cook it yourself… or you could get it delivered to your home. You’d probably go for the delivery (especially if it would be free) instead of cooking it each time. But this supposes that there are people out there cooking Bouillabaisse for you. CRAN essentially cooks the package source codes into binaries for Windows and macOS, as shown below:
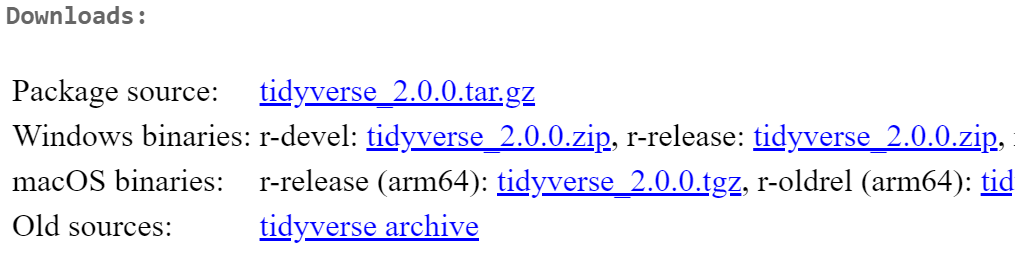
In the image above, you can see links to compiled binaries of the {tidyverse} package for Windows and macOS, but none for any Linux distribution. This is because, as stated in the introduction, there are many, many, many Linux distributions. So at best, CRAN could offer binaries for Ubuntu, but Ubuntu is not the only Linux distribution, and Ubuntu has two releases a year, which means that every CRAN package (that needs compilation) would need to get compiled twice a year. This is a huge undertaking unless CRAN decided to only offer binaries for LTS releases. But that would still be every two years.
So instead, what happens, is that the burden of compilation is pushed to the user. Every time you type install.packages("package_name"), and if that package requires compilation, that package gets compiled on your machine which not only takes some time, but can also fail. This is because very often, R packages that require compilation need some additional system-level dependencies that need to be installed. For example, here are the Ubuntu dependencies that need to be installed for the installation of the {tidyverse} package to succeed:
libicu-dev
zlib1g-dev
make
libcurl4-openssl-dev
libssl-dev
libfontconfig1-dev
libfreetype6-dev
libfribidi-dev
libharfbuzz-dev
libjpeg-dev
libpng-dev
libtiff-dev
pandoc
libxml2-dev
This is why r2u is so useful: by adding this repository, what you’re essentially doing is telling R to not fetch the packages from CRAN, but from the r2u repository. And this repository contains compiled R packages for Ubuntu. So the required system-level dependencies get installed automatically and the R package doesn’t need compilation. So installation of the {tidyverse} package takes less than half a minute on a modern machine.
But if r2u is so nice, why did I say above that we would not be using it? Unfortunately, this is because r2u does not archive compiled binaries of older packages, and this is exactly what we need for reproducibility. So when you’re building a Docker image to make a project reproducible, because that image will be based on Ubuntu, we will need to make sure that our Docker image contains the right system-level dependencies so that compilation of the R packages doesn’t fail. Thankfully, you’re reading the right book.
14.3 First steps with Docker
Let’s start by creating a “Hello World” Docker image. As I explained in the beginning, to define a Docker image, we need to create a Dockerfile with some instructions. But first, you need of course to install Docker. To install Docker on any operating system (Windows, macOS or Ubuntu or other Linuxes), you can install Docker Desktop3. If you’re running Ubuntu (or another Linux distribution) and don’t want the GUI, you could install the Docker engine4 and then follow the post-installation steps for Linux5 instead.
In any case, whatever operating system you’re using, we will be using the command line to interact with Docker. Once you’re done with installing Docker, create a folder somewhere on your computer, and create inside of this folder an empty text file with the name “Dockerfile”. This can be tricky on Windows, because you have to remove the .txt extension that gets added by default. You might need to turn on the option “File name extensions” in the View pane of the Windows file explorer to make this process easier. Then, open this file with your favourite text editor, and add the following lines:
FROM ubuntu:jammy

RUN uname -a
This very simple Dockerfile does two things: it starts by stating that it’s based on the Ubuntu Jammy (so version 22.04) operating system, and then runs the uname -a command. This command, which gets run inside the Ubunu command line, prints the Linux kernel version from that particular Ubuntu release. FROM and RUN are Docker commands; there are a couple of others that we will discover a bit later. Now, what do you do with this Dockerfile? Remember, a Dockerfile defines an image. So now, we need to build this image to run a container. Open a terminal/command prompt in the folder where the Dockerfile is and type the following:
owner@localhost ➤ docker build -t raps_hello .The docker build command builds an image from the Dockerfile that is in the path . (a single . means “this current working directory”). The -t option tags that image with the name raps_hello. If everything goes well, you should see this output:
Sending build context to Docker daemon  2.048kB
Step 1/2 : FROM ubuntu:jammy
 ---> 08d22c0ceb15
Step 2/2 : RUN uname -a
 ---> Running in 697194b9a519
Linux 697194b9a519 6.2.6-1-default #1 SMP PREEMPT_DYNAMIC
     Mon Mar 13 18:57:27 UTC 2023 (fa1a4c6) x86_64 x86_64 x86_64 GNU/Linux
Removing intermediate container 697194b9a519
 ---> a0ea59f23d01
Successfully built a0ea59f23d01
Successfully tagged raps_hello:latest
Look at Step 2/2: you should see the output of the uname -a command:
Linux 697194b9a519 6.2.6-1-default #1 SMP PREEMPT_DYNAMIC
     Mon Mar 13 18:57:27 UTC 2023 (fa1a4c6) x86_64 x86_64 x86_64 GNU/Linux
Every RUN statement in the Dockerfile gets executed at build time: so this is what we will use to install R and needed packages. This way, once the image is built, we end up with an image that contains all the software we need.
Now, we would like to be able to use this image. Using a built image, we can start one or several containers that we can use for whatever we want. Let’s now create a more realistic example. Let’s build a Docker image that comes with R pre-installed. But for this, we need to go back to our Dockerfile and change it a bit:
FROM ubuntu:jammy

ENV TZ=Europe/Luxembourg

RUN ln -snf /usr/share/zoneinfo/$TZ /etc/localtime && echo $TZ > /etc/timezone

RUN apt-get update && apt-get install -y r-base

CMD ["R"]
First we define a variable using ENV, called TZ and we set that to the Europe/Luxembourg time zone (you can change this to your own time zone). We then run a rather complex looking command that sets the defined time zone system-wide. We had to do all this, because when we will later install R, a system-level dependency called tzdata gets installed alongside it. This tool then asks the user to enter his or her time zone interactively. But we cannot interact with the image interactively as it’s being built, so the build process gets stuck at this prompt. By using these two commands, we can set the correct time zone and once tzdata gets installed, that tool doesn’t ask for the time zone anymore, so the build process can continue. This is a rather known issue when building Docker images based on Ubuntu, so the fix is easily found with a Google search (but I’m giving it to you, dear reader, for free).
Then come RUN statements. The first one uses Ubuntu’s package manager to first refresh the repositories (this ensures that our local Ubuntu installation repositories are in sync with the latest software updates that were pushed to the central Ubuntu repos). Then we use Ubuntu’s package manager to install r-base. r-base is the package that installs R. We then finish this Dockerfile by running CMD ["R"]. This is the command that will be executed when we run the container. Remember: RUN commands get executed at build-time, CMD commands at run-time. This distinction will be important later on.
Let’s build the image (this will take some time, because a lot of software gets installed):
owner@localhost ➤ docker build -t raps_ubuntu_r .This builds an image called raps_ubuntu_r. This image is based on Ubuntu 22.04 Jammy Jellyfish and comes with R pre-installed. But the version of R that gets installed is the one made available through the Ubuntu repositories, and as of writing that is version 4.1.2, while the latest version available is R version 4.2.3. So the version available through the Ubuntu repositories lags behind the actual release. But no matter, we will deal with that later.
We can now start a container with the following command:
owner@localhost ➤ docker run raps_ubuntu_rAnd this is the output we get:
Fatal error: you must specify '--save', '--no-save' or '--vanilla'What is going on here? When you run a container, the command specified by CMD gets executed, and then the container quits. So here, the container ran the command R, which started the R interpreter, but then quit immediately. When quitting R, users should specify if they want to save or not save the workspace. This is what the message above is telling us. So, how can we use this? Is there a way to use this R version interactively?
Yes, there is a way to use this R version boxed inside our Docker image interactively, even though that’s not really what we want to achieve. What we want instead is that our pipeline gets executed when we run the container. We don’t want to mess with the container interactively. But let me show you how we can interact with this dockerized R version. First, you need to let the container run in the background. You can achieve this by running the following command:
owner@localhost ➤ docker run -d -it --name ubuntu_r_1 raps_ubuntu_rThis runs the container that we name “ubuntu_r_1” from the image “raps_ubuntu_r” (remember that we can run many containers from one single image definition). Thanks to the option -d, the container runs in the background, and the option -it states that we want an interactive shell to be waiting for us. So the container runs in the background, with an interactive shell waiting for us, instead of launching (and then immediately stopping) the R command. You can now “connect” to the interactive shell and start R in it using:
owner@localhost ➤ docker exec -it ubuntu_r_1 RYou should now see the familiar R prompt:
R version 4.1.2 (2021-11-01) -- "Bird Hippie"
Copyright (C) 2021 The R Foundation for Statistical Computing
Platform: x86_64-pc-linux-gnu (64-bit)

R is free software and comes with ABSOLUTELY NO WARRANTY.
You are welcome to redistribute it under certain conditions.
Type 'license()' or 'licence()' for distribution details.

R is a collaborative project with many contributors.
Type 'contributors()' for more information and
'citation()' on how to cite R or R packages in publications.

Type 'demo()' for some demos, 'help()' for on-line help, or
'help.start()' for an HTML browser interface to help.
Type 'q()' to quit R.

>
Welcome to a dockerized version of R. Now, all of this might have felt overly complicated to you. And of course if this is the first time that you have played around with Docker, it is tricky indeed. However, you shouldn’t worry too much about it, for several reasons:
- we are not going to use Docker containers interactively, that’s not really the point, but it can be useful to log in into the running container to check if things are working as expected;
- we will build our images on top of pre-built images from the Rocker project6 and these images come with a lot of software pre-installed and configuration taken care of.
What you should take away from this section is that you need to write a Dockerfile which then allows you to build an image. This image can then be used to run one (or several) containers. These containers, at run-time, will execute our pipeline in an environment that is frozen, such that the output of this run will stay constant, forever.
14.4 The Rocker project
The Rocker project offers a very large collection of “R-ready” Docker images that you can use as starting points for building your own Docker images. Before using these images though, I still need to explain one very important Docker concept. Let’s go back to our “Hello World” Docker image:
FROM ubuntu:jammy

RUN uname -a
The very first line, FROM ubuntu:jammy downloads an Ubuntu Jammy image, but from where? All these images get downloaded from Docker Hub, which you can browse here7. If you create an account you can even push your own images on there. For example, we could push the image we built before, which we called raps_ubuntu_r, on Docker Hub. Then, if we wanted to create a new Docker image that builds upon raps_ubuntu_r we could simply type FROM username:raps_ubuntu_r (or something similar).
It’s also possible to not use Docker Hub at all, and share the image you built as a file. I’ll explain how later.
The Rocker project offers many different images, which are described here8. We are going to be using the versioned images. These are images that ship specific versions of R. This way, it doesn’t matter when the image gets built, the same version of R will be installed by getting built from source. Let me explain why building R from source is important. When we build the image from the Dockerfile we wrote before, R gets installed from the Ubuntu repositories. For this we use Ubuntu’s package manager and the following command: apt-get install -y r-base. As of writing, the version of R that gets installed is version 4.1.3. There’s two problems with installing R from Ubuntu’s repositories. First, we have to use whatever gets installed, which can be a problem with reproducibility. If we ran our analysis using R version 4.2.1, then we would like to dockerize that version of R. The second problem is that when we build the image today we get version 4.1.3. But it is not impossible that if we build the image in 6 months, we get R version 4.2.0, because it is likely that the version that ships in Ubuntu’s repositories will get updated at some point.
This means that depending on when we build the Docker image, we might get a different version of R. There are only two ways of avoiding this problem: either we build the image once and archive it and make sure to always keep a copy and ship that copy forever (or for as long as we want to make sure that pipeline is reproducible) just as you would ship data, code and any documentation required to make the pipeline reproducible. Or we write the Dockerfile in such a way that it always produces the same image, regardless of when it gets built. I very strongly advise you to go for the second option, but to also archive the image. But of course, this also depends on how critical your project is. Maybe you don’t need to start archiving images, or maybe you don’t even need to make sure that the Dockerfile always produces the same image. But I would still highly recommend that you write your Dockerfiles in such a way that they always output the same image. It is safer, and it doesn’t really mean extra work, thanks to the Rocker project.
So, let’s go back to the Rocker project, and specifically their versioned images which you can find here9. When you use one of the versioned images as a base for your project, you get the following guarantees:
- a fixed version of R that gets built from source. It doesn’t matter when you build the image, it will always ship with the same version of R;
- the operating system will be the LTS release that was current when that specific version of R was current;
- the R repositories are set to the Posit Public Package Manager (PPPM) at a specific date. This ensures that R packages don’t need to be compiled as PPPM serves binary packages for the amd64 architecture (which is the architecture that virtually all non-Apple computers use these days).
This last point requires some more explanations. You should know that versioned Rocker images use the PPPM set at a specific date. This is a very neat feature of the PPPM. For example, the versioned Rocker image that comes with R 4.2.2 has the repos set at the 14th of March 2023, as you can see for yourself here10. This means that if you use install.packages("dplyr") inside a container running from that image, then the version of {dplyr} that will get installed is the one that was available on the 14th of March.
This can be convenient in certain situations, and you may want, depending on your needs, to use the PPPM set a specific date to define Docker images, as the Rocker project does. You could even set the PPPM at a specific date for your main development machine (just follow the instructions here11). But keep in mind that you will not be getting any updates to packages, so if you want to install a fresh version of a package that may introduce some nice new features, you’ll need to change the repos again. This is why I highly advise you to stay with your default repositories (or use r2u if you are on Ubuntu) and manage your projects’ package libraries using {renv}. This way, you don’t have to mess with anything, and have the flexibility to have a separate package library per project. The other added benefit is that you can then use the project’s renv.lock file to install the exact same package library inside the Docker image.
As a quick introduction to using Rocker images, let’s grab our pipeline’s renv.lock file which you can download from here12. This is the latest renv.lock file that we generated for our pipeline, it contains all the needed packages to run our pipeline, including the right versions of the {targets} package and the {housing} package that we developed. An important remark: it doesn’t matter if the renv.lock file contains packages that were released after the 14th of March. Even if the repositories inside the Rocker image that we will be using are set to that date, the lock file also specifies the URL of the right repository to download the packages from. So that URL will be used instead of the one defined for the Rocker image.
Another useful aspect of the renv.lock file is that it also records the R version that was used to originally develop the pipeline, in this case, R version 4.2.2. So that’s the version we will be using in our Dockerfile. Next, we need to check the version of {renv} that we used to build the renv.lock file. You don’t necessarily need to install the same version, but I recommend you do. For example, as I’m writing these lines, {renv} version 0.17.1 is available, but the renv.lock file was written by {renv} version 0.16.0. So to avoid any compatibility issues, we will also install the exact same version. Thankfully, that is quite easy to do (to check the version of {renv} that was used to write the lock file simply look for the word “renv” in the lock file).
While {renv} takes care of installing the right R packages, it doesn’t take care of installing the right system-level dependencies. So that’s why we need to install these system-level dependencies ourselves. I will give you a list of system-level dependencies that you can install to avoid any issues below, and I will also explain to you how I was able to come up with this list. It is quite easy thanks to Posit and their PPPM. For example, here13 is the summary page for the {tidyverse} package. If you select “Ubuntu 22.04 (Jammy)” on the top right, and then scroll down, you will see a list of dependencies that you can simply copy and paste into your Dockerfile:
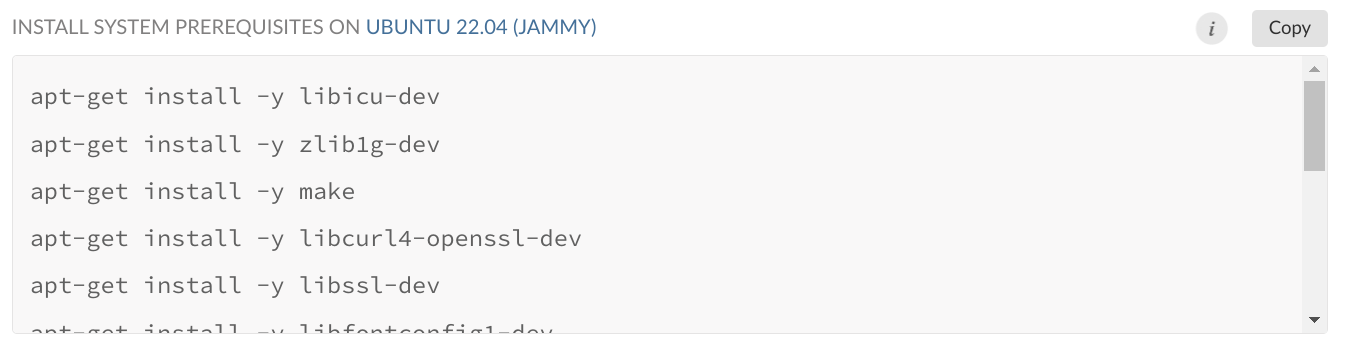
We will use this list to install the required dependencies for our pipeline.
Create a new folder and call it whatever you want and save the renv.lock file linked above inside of it. Then, create an empty text file and call it Dockerfile. Add the following lines:
FROM rocker/r-ver:4.2.2

RUN apt-get update && apt-get install -y \
    libglpk-dev \
    libxml2-dev \
    libcairo2-dev \
    libgit2-dev \
    default-libmysqlclient-dev \
    libpq-dev \
    libsasl2-dev \
    libsqlite3-dev \
    libssh2-1-dev \
    libxtst6 \
    libcurl4-openssl-dev \
    libharfbuzz-dev \
    libfribidi-dev \
    libfreetype6-dev \
    libpng-dev \
    libtiff5-dev \
    libjpeg-dev \
    libxt-dev \
    unixodbc-dev \
    wget \
    pandoc

RUN R -e "install.packages('remotes')"

RUN R -e "remotes::install_github('rstudio/renv@0.16.0')"

RUN mkdir /home/housing

COPY renv.lock /home/housing/renv.lock

RUN R -e "setwd('/home/housing');renv::init();renv::restore()"
The first line states that we will be basing our image on the image from the Rocker project that ships with R version 4.2.2, which is the right version that we need. Then, we install the required system-level dependencies using Ubuntu’s package manager, as previously explained. Then comes the {remotes} package. This will allow us to download a specific version from {renv} from Github, which is what we do in the next line. I want to stress again that I do this simply because the original renv.lock file was generated using {renv} version 0.16.0 and so to avoid any potential compatibility issues, I also use this one to restore the required packages for the pipeline. But it is very likely that I could have installed the current version of {renv} to restore the packages, and that it would have worked without problems. (Note that for later versions of {renv}, you may need to insert a ‘v’ before the version number: renv@v1.0.2 for example.) But just to be on the safe side, I install the right version of {renv}. By the way, I knew how to do this because I read this vignette14 that explains all these steps (but I’ve only kept the absolute essential lines of code to make it work). Next comes the line RUN mkdir /home/housing, which creates a folder (mkdir stands for make directory), inside the Docker image, in /home/housing. On Linux distributions, /home/ is the directory that users use to store their files, so I create the /home/ folder and inside of it, I create a new folder, housing which will contain the files for my project. It doesn’t really matter if you keep that structure or not, you could skip the /home/ folder if you wanted. What matters is that you put the files where you can find them.
Next comes COPY renv.lock /home/housing/renv.lock. This copies the renv.lock file from our computer (remember, I told you to save this file next to the Dockerfile) to /home/housing/renv.lock. By doing this, we include the renv.lock file inside of the Docker image which will be crucial for the next and final step: RUN R -e "setwd('/home/housing');renv::init();renv::restore()".
This runs the R program from the Linux command line with the option -e. This option allows you to pass an R expression to the command line, which needs to be written between "". Using R -e will quickly become a habit, because this is how you can run R non-interactively, from the command line. The expression we pass sets the working directory to /home/housing, and then we use renv::init() and renv::restore() to restore the packages from the renv.lock file that we copied before. Using this Dockerfile, we can now build an image that will come with R version 4.2.2 pre-installed as well as all the same packages that we used to develop the housing pipeline.
Build the image using docker build -t housing_image . (don’t forget the . at the end).
The build process will take some time, so I would advise you to go get a hot beverage in the meantime. Now, we did half the work: we have an environment that contains the required software for our pipeline, but the pipeline files themselves are missing. But before adding the pipeline itself, let’s see if the Docker image we built is working. For this, log in to a command line inside a running Docker container started from this image with this single command:
owner@localhost ➤ docker run --rm -it --name housing_container housing_image bashThis starts bash (Ubuntu’s command line) inside the housing_container that gets started from the housing_image image. We add the --rm flag to docker run, this way the Docker container gets stopped when we log out (if not, then the Docker container will continue running in the background). Once logged in, we can move to the folder’s project using:
user@docker ➤ cd home/housingand then start the R interpreter:
user@docker ➤ Rif everything goes well, you should see the familiar R prompt with a message from {renv} at the end:
R version 4.2.2 (2022-10-31) -- "Innocent and Trusting"
Copyright (C) 2022 The R Foundation for Statistical Computing
Platform: x86_64-pc-linux-gnu (64-bit)

R is free software and comes with ABSOLUTELY NO WARRANTY.
You are welcome to redistribute it under certain conditions.
Type 'license()' or 'licence()' for distribution details.

  Natural language support but running in an English locale

R is a collaborative project with many contributors.
Type 'contributors()' for more information and
'citation()' on how to cite R or R packages in publications.

Type 'demo()' for some demos, 'help()' for on-line help, or
'help.start()' for an HTML browser interface to help.
Type 'q()' to quit R.

* Project '/home/housing' loaded. [renv 0.16.0]
Try to load the {housing} package with library("housing"). This should work flawlessly!
14.5 Dockerizing projects
So we now have a Docker image that has the right environment for our project. We can now dockerize the project itself. There are two ways to do this: we either simply add the required lines to our Dockerfile, meaning copying the _targets.R script to the Docker image at build time and then use targets::tar_make() to run the pipeline, or we now create a new Dockerfile that will build upon this image and add the required lines there. In this section, we will use the first approach, and in the next section, we will use the second. The advantage of the first approach is that we have a single Dockerfile, and everything we need is right there. Also, each Docker image is completely tailor-made for each project. The issue is that building takes some time, so if for every project we restart from scratch it can be tedious to have to wait for the build process to be done (especially if you use continuous integration, as we shall see in the next chapter).
The advantage of the second approach is that we have a base that we can keep using for as long as we want. You will only need to wait once for R and the required packages to get installed. Then, you can use this base for any project that requires the same version of R and packages. This is especially useful if you don’t update your development environment very often, and develop a lot of projects with it.
In summary, the first approach is “dockerize pipelines”, and the second approach is “dockerize the dev environment and use it for many pipelines”. It all depends on how you work: in research, you might want to go for the first approach, as each project likely depends on bleeding-edge versions of R and packages. But in industry, where people tend to put the old adage “if ain’t broke don’t fix it” into practice, dev environments are usually frozen for some time and only get updated when really necessary (or according to a fixed schedule).
To dockerize the pipeline, we first need to understand something important with Docker, which I’ve already mentioned in passing: a Docker image is an immutable sandbox. This means that we cannot change it at run-time, only at build-time. So if we log in to a running Docker container (as we did before), and install an R package using install.packages("package_name"), that package will disappear if we stop that container. The same is true for any files that get created at run-time: they will also disappear once the container is stopped. So how are we supposed to get the outputs that our pipeline generates from the Docker container? For this, we need to create a volume. A volume is nothing more than a shared folder between the Docker container and the host machine that starts the container. We simply need to specify the path for this shared folder when running the container, and that’s it.
Let’s first write a Dockerfile that contains all the necessary files. We simply need to add the _targets.R script from our pipeline, the analyse_data.Rmd markdown file and all the functions from the functions/ folder (you can find all the required files here15):
FROM rocker/r-ver:4.2.2

RUN apt-get update && apt-get install -y \
    libglpk-dev \
    libxml2-dev \
    libcairo2-dev \
    libgit2-dev \
    default-libmysqlclient-dev \
    libpq-dev \
    libsasl2-dev \
    libsqlite3-dev \
    libssh2-1-dev \
    libxtst6 \
    libcurl4-openssl-dev \
    libharfbuzz-dev \
    libfribidi-dev \
    libfreetype6-dev \
    libpng-dev \
    libtiff5-dev \
    libjpeg-dev \
    libxt-dev \
    unixodbc-dev \
    wget \
    pandoc

RUN R -e "install.packages('remotes')"

RUN R -e "remotes::install_github('rstudio/renv@0.16.0')"

RUN mkdir /home/housing

RUN mkdir /home/housing/pipeline_output

RUN mkdir /home/housing/shared_folder

COPY renv.lock /home/housing/renv.lock

COPY functions /home/housing/functions

COPY analyse_data.Rmd /home/housing/analyse_data.Rmd

COPY _targets.R /home/housing/_targets.R

RUN R -e "setwd('/home/housing');renv::init();renv::restore()"

RUN cd /home/housing && R -e "targets::tar_make()"

CMD mv /home/housing/pipeline_output/* /home/housing/shared_folder/
I’ve added some COPY statements to copy the files from our computer to the Docker image, and also created some new directories: the pipeline_output and the shared_folder directories. pipeline_output is the folder that will contain all the outputs from the pipeline, and shared_folder (you guessed it) will be the folder that we will use to save the outputs of the pipeline to our computer.
I then use targets::tar_make() to run the pipeline, but I first need to use cd /home/housing to change directories to the project’s folder. This is because in order to use the library that {renv} installed, we need to start the R session in the right directory. So we move to the right directory, then we run the pipeline using R -e "targets::tar_make()". Notice that we do both operations within a RUN statement. This means that the pipeline will run at build-time (remember, RUN statements run at build-time, CMD statements at run-time). In other words, the image will contain the outputs. This way, if the build process and the pipeline take a long time to run, you can simply leave them running overnight for example. In the morning, while sipping on your coffee, you can then simply run the container to instantly get the outputs. This is because we move the outputs of the pipeline from the folder pipeline_output to the shared_folder folder using a CMD statament. Thus, when we run the container, the outputs get moved into the shared folder, and we can retrieve them.
One last thing I had to do: I needed to change the last target in the _targets.R script. Before dockerizing it, it was like this:
tar_render(
  analyse_data,
  "analyse_data.Rmd"
)
but I had to change it to this:
tar_render(
  analyse_data,
  "analyse_data.Rmd",
  output_dir = "/home/housing/pipeline_output"
)
The argument to output_dir gets passed to knitr::knit() and simply states that the output files should be saved in that folder. I can now build the image using docker build -t housing_image .. Once the build process is done, we can log in to the container to see if our files are there. But let me repeat again, that you are not really supposed to do so. You could simply run the container now and get your files. But let’s just take a quick look. You can log in to a bash session using:
owner@localhost ➤ docker run --rm -it --name housing_container housing_image bashIf you then move to /home/housing/pipeline_output and run ls in that folder, you should see analyse_data.html. That’s our output! So how do we get it out?
You need to run the container with the -v flag which allows you to specify the path to the shared folder on your computer, and the shared folder inside the Docker container. The code below shows how to do it (I’ve used the \ to break this long command over two lines):
owner@localhost ➤ docker run --rm --name housing_container -v \
                  /host/path/to/shared_folder:/home/housing/shared_folder:rw \
                  housing_image
/host/path/to/shared_folder is the path to the shared folder on my computer. /home/housing/shared_folder is the path to the shared folder inside the Docker container. When these lines run, the very last CMD statement from the Dockerfile runs, moving the contents from inside the Docker container to our computer. If you check the contents of the shared_folder on your computer, you will see analyse_data.html in there.
That’s it, we have now a complete reproducible analytical pipeline. We managed to tick every one of the following boxes when running our pipeline:
- Same version of R that was used for development;
- Same versions of all the packages that were used for development;
- The whole stack runs on a “frozen” environment;
- We can reproduce this environment (but more on that later…).
We now need to share all this with the world. One simple solution is to share the Dockerfile on Github. For example, this is the repository16 with all the required code to build the Docker image and run the pipeline. But we could also share the built image so that users only need to run the pipeline to instantly get the results. In the next section, we will learn about dockerizing development environments, and then see how we can share images that have already been built.
14.6 Dockerizing development environments
14.6.1 Creating a base image for development
In the previous section, I mentioned that you could either “dockerize pipelines” or “dockerize the dev environment and use it for many pipelines”. What we learned up until now was how to dockerize one single pipeline. In this section, we will learn how to build and dockerize an environment, and then build pipelines that use this environment as starting points.
Let me first explain, again, why (or when) you might want to use this approach instead of the “dockerizing pipelines” approach.
Depending on what or where you work, it is sometimes necessary to have a stable development environment that only gets rarely updated (following a strict schedule). In my own experience, when I was doing research I was almost always using the latest R version and packages. When I joined the private sector, we worked on an environment that we developers could not update ourselves. That environment was updated according to a fixed schedule and now that I’m back in the public sector (but not doing research), I work in a similar manner, on a “frozen” environment. Working on frozen environments like this minimizes the unexpected issues that frequent updates can bring. So how can we use Docker to use such an approach?
The idea is to split up the Dockerfile we used in the previous section into two parts. The first part would consist in setting up everything that is “OS-related”. So installing R, packages, and system-level dependencies. The second Dockerfile would use the image defined thanks to the first Dockerfile as a base and then add the required lines to obtain the results from the pipeline. The first image, that focuses on the operating system, can be archived and re-used for as long as required to keep building pipelines. Once we update our environment, we can then re-generate a new Docker image that reflects this update.
Let’s do this now. The first image would simply consist of these lines:
FROM rocker/r-ver:4.2.2

RUN apt-get update && apt-get install -y \
    libglpk-dev \
    libxml2-dev \
    libcairo2-dev \
    libgit2-dev \
    default-libmysqlclient-dev \
    libpq-dev \
    libsasl2-dev \
    libsqlite3-dev \
    libssh2-1-dev \
    libxtst6 \
    libcurl4-openssl-dev \
    libharfbuzz-dev \
    libfribidi-dev \
    libfreetype6-dev \
    libpng-dev \
    libtiff5-dev \
    libjpeg-dev \
    libxt-dev \
    unixodbc-dev \
    wget \
    pandoc

RUN R -e "install.packages('remotes')"

RUN R -e "remotes::install_github('rstudio/renv@0.16.0')"
This image can then be built using docker build -t dev_env_r . (if you followed along, the cache will be used and this image should get built instantly). This simply installs all the packages and system-level dependencies that are common and needed for all pipelines. Then, each specific package libraries that are required for each pipeline will get installed using the pipeline-specific renv.lock file. This will be done with a second Dockerfile. But first, we need to make the dev_env_r image available to others, such that it becomes possible to build new images upon dev_env_r. There are two ways to make images available to anyone: either online through Docker Hub17 (in case there’s nothing preventing you from sharing the development environment through Docker Hub) or locally, by compressing the images and sharing them internally (in case you don’t want to share your images with the world, because they contain proprietary software that you’ve developed within your company for example). I want to stress that making the image available through Docker Hub is different from sharing the Dockerfile through Github. You could just share the Dockerfiles through Github, and then tell users to first build the dev environment, and then build the pipeline image by building the second, pipeline-specific Dockerfile. But by sharing a built image from Docker Hub, users (including future you) will only need to build the pipeline-specific image and this is much faster. Just like we used FROM ubuntu:jammy in our Dockerfiles before, we will now use something like FROM my_repo/my_image:version_number from now on.
In the next section I will discuss sharing images on Docker Hub, but before that, let me first address the elephant in the room: the development environment that you are using may not be the one you are dockerizing. For example, if you are using Windows or macOS on your computer, then the environment that you are dockerizing will be different since it will be based on Ubuntu. There are only four solutions to this conundrum:
- You don’t care, and maybe that’s fine. As I stated multiple times, the same pipeline outputting different results due to different operating systems is in practice rare (but it can happen);
- You prefer being safe than sorry, and install Ubuntu on your pc as well. This is very often not an acceptable solution, however.
- You develop on your host environment, but after you’re done you compare the results obtained from the Docker container to those obtained on your development environment.
- You use the Docker image not only to ship RAPs, but also for development.
The last option implies that you use Docker interactively, which is not ideal, but it is possible. For example, you could install RStudio server and run a Dockerized version of RStudio from a running Docker container. This is actually what happens if you follow the instructions on the Rocker project’s homepage. You can get a dockerized RStudio instance by running:
owner@localhost ➤ docker run --rm -ti -e PASSWORD=yourpassword -p 8787:8787 rocker/rstudioand then going to http://localhost:8787 on your web-browser. You can then log in with the username “rstudio” and the password “yourpassword”. But you would also need to mount a volume (I called it “shared folder” previously) to keep the files you edit on your computer (remember, Docker container are immutable, so any files created within a Docker container will be lost when it’s stopped). Overall, I think that this is too cumbersome, especially because the risks of getting different results only because of your operating system are very, very, very low. I would simply advise the following:
- Use the same version of R on your computer and on Docker;
- Use the same package library on your computer and on Docker by using the same
renv.lockfile.
By following these two rules, you should keep any issues to a minimum. When or if you need to update R and/or the package library on your machine, simply create a new Docker image that reflects these changes.
However, if you work in a field where operating system versions matter, then yes, you should find a way to either use the dockerized environment for development, or you should install Ubuntu on your computer (the same version as in Docker of course).
Let’s now discuss sharing images.
14.7 Some issues of relying on Docker
14.7.1 The problems of relying so much on Docker
So we now know how to build truly reproducible analytical pipelines, but let’s be blunt, relying entirely on one single tool, Docker, is a bit of an issue… it’s a single point of failure. But the problem is not Docker itself, but the infrastructure.
Let me explain: Docker is based on many different open-source parts, and that’s great. This means that even if the company behind Docker ruins it by taking some weird decisions, we have alternatives that build upon the open-source parts of Docker. There’s Podman, which is a drop-in replacement (when combined with other tools) made by Red Hat, which is completely open-source as well. So the risk does not come from there, because even if for some reason Docker would disappear, or get abandoned or whatever, we could still work with Podman, and it would also be technically possible to create a fork from Docker.
But the issue is the infrastructure. For now, using Docker and more importantly hosting images is free for personal use, education, open-source communities and small businesses. So this means that a project like Rocker likely pays nothing for hosting all the images they produce (but who knows, I may be wrong on this). But in early 2023, Docker announced that they would abandon their Docker Free Team subscription plans that some open-source organisations use, meaning that these organisations had 30 days to switch to a paid subscription. Docker finally did not do this, but it is not unreasonable to think that they might change their minds once more and this time really go through with this plan. Don’t get me wrong, I’m not saying that Docker is not allowed to make money. But it is something that you need to keep in mind in case you cannot afford a subscription (and who knows how much it’s going to cost). This is definitely a risk that needs mitigation, and thus a plan B. This plan B could be to host the images yourself, by saving them using docker save. Or you could even self-host an image registry (or lobby your employer/institution/etc to host a registry for its developers/data scientists/researchers). In any case, it’s good to have options and know what potential risks using this technology entail.
14.7.2 Is Docker enough?
I would say that for 99% of applications, yes, Docker is enough for building RAPs. But strictly speaking, using a Dockerfile which installs a specific version of R and uses {renv} to install specific versions of packages and use an LTS release of Ubuntu, we could end up with two different images. This is because Ubuntu gets updated, so if you build an image in the beginning of 2022 and then once again in 2023, the system-level libraries will be different. So strictly speaking, you end up with two different images, and it’s not absolutely impossible that this may impact your pipeline. So ideally, we would also need a way to always install the same system-level dependencies, regardless of when we build the image. There is a package manager called Nix that makes this possible, but this is outside the scope of this book. The reason is that, again, in practice if you use an LTS release you should be fine. But if you really require bitwise reproducibility (i.e., two runs of the same pipeline will yield the same result to the last bit), then yes, you should definitely look into Nix (and who knows, I might write a book just about that titled Building bitwise reproducible analytical pipelines (braps) using Nix).
Another issue with Docker is that images can be quite opaque, especially if you define images that pull from images that pull themselves from other images… Just look at our pipeline: it pulls from dev_env_r, which pulls from rocker:4.2.2 which pulls itself from the official Ubuntu Jammy image. So to be fully transparent, we would need to link to all the Dockerfiles, or rewrite one big Dockerfile that pulls from Ubuntu Jammy only.
14.8 Conclusion
This book could stop here. We have learned the following things:
- version control;
- functional programming;
- literate programming;
- package development;
- testing;
- build automation;
- “basic” reproducibility using
{renv}; - “total” reproducibility using Docker.
It is now up to you to select the tools that are most relevant for your projects. You might not need to package code for example. Or maybe literate programming is irrelevant to your needs. But it is difficult to argue against Docker. If you need to keep re-running a pipeline for some years, Docker is (almost) the only option available (unless you dedicate an entire physical machine to running that pipeline and never, ever, again touch that machine).
In the next and final chapter, we will learn some basics about continuous integration with Github Actions, which will allow us to automate even the building of Docker images and running pipelines.
https://packages.ubuntu.com/jammy/↩︎
https://github.com/eddelbuettel/r2u↩︎
https://docs.docker.com/desktop/↩︎
https://docs.docker.com/engine/install/ubuntu/#install-using-the-repository↩︎
https://docs.docker.com/engine/install/linux-postinstall/#manage-docker-as-a-non-root-user↩︎
https://rocker-project.org/↩︎
https://hub.docker.com/↩︎
https://rocker-project.org/images/↩︎
https://rocker-project.org/images/versioned/r-ver.html↩︎
https://is.gd/fdrq4p↩︎
https://is.gd/jbdTKC↩︎
https://is.gd/5UcuxW↩︎
https://is.gd/ZaXHwa↩︎
https://rstudio.github.io/renv/articles/docker.html↩︎
https://github.com/rap4all/housing/tree/pipeline↩︎
https://github.com/rap4all/housing/tree/docker↩︎
https://hub.docker.com/↩︎
https://is.gd/7eiz5L↩︎