15 Continuous integration and continuous deployment
As I wrote in the conclusion of the previous chapter, the book could have stopped there. So consider this chapter as a bonus. What I’m going to show here is not the most important aspect of reproducibility, and you could even make the case that it is not needed at all. However, I still think that it is worth showing you how to use CI/CD, even if only superficially, and then you decide whether this is a tool that you should add to your toolbox.
The CI/CD (Continuous Integration and Continuous Deployment or Delivery) platform I’ll be discussing here is GitHub Actions, which should not surprise you since we’ve been using GitHub for version control. But maybe you’re wondering what a “CI/CD platform” even is, so let me start there.
Let’s go back to the first idea of this book: Don’t Repeat Yourself. We have written functions and used tools such as {renv} to avoid having to repeat ourselves. And yet, when it comes to using Docker, we need to keep building and running containers, running docker build and docker run over and over again. It would be great if instead, we didn’t need to do it. This is what a CI/CD platform essentially allows you to do. The idea is that building, running and, if applicable, deploying are also tasks that can be automated, so why not automate them and only take care of writing code? And as the size of your team grows, the need to automate these tasks grows as well. Using CI/CD is an essential part of the DevOps methodology for software engineering.
This chapter can be seen as a small introduction to DevOps for data science.
DevOps is a set of practices, tools, and a cultural philosophy that automate and integrate the processes between software development and IT teams. It emphasizes team empowerment, cross-team communication and collaboration, and technology automation.
Most of the tools and practices described in this book would make adopting DevOps in your day-to-day a breeze. Strictly speaking though, we will be using “GitOps”, because our GitHub repository will be the centre stage of our project. The GitHub repository will not only contain the code of our project but also the definition of the infrastructure the code will run on. This way, our GitHub repository will be a single source of truth.
Concretely this means that each time we will push code (or merge a pull request, or perform any other Git-related event) to our GitHub repository, we can define a certain set of arbitrary actions to get executed, like building a Docker image. This image can then be pushed to Docker Hub, or a container can be executed. This container in turn can run a pipeline and the output can then be downloaded from GitHub. All of this happens in the cloud; all you need to do is push code changes to GitHub. As stated in the chapter on Git, GitHub offers 2,000 minutes of computation time a month for CI/CD, which should be really sufficient for a lot of purposes (but of course, if your RAP takes hours to complete, you might want to run it locally instead).
GitHub Actions is very flexible, and you could use it to perform many tasks, not just building Docker images or running containers. For example, this book gets built and published online automatically each time I push an update to the repository2 holding the book’s source code. If you’re developing a package, you could run R CMD check each time you push code to the repository. R CMD check runs many tests, including the package’s unit tests (when using {fusen}, R CMD check is run each time a flat file gets inflated.) and using GitHub Actions, it’s possible to run R CMD check on Ubuntu (Linux), Windows and even macOS (see this documentation page3 if you’re interested).
In this chapter, I’m going to show you how to use GitHub Actions to:
- run some simple arbitrary code;
- run a
{targets}pipeline without Docker; - build a Docker image containing a development environment (dev env) and push it to Docker Hub when pushing changes to its Dockerfile on GitHub;
- run a Docker container that runs a RAP and builds some output that we can then download from GitHub.
Finally, what does integration and deployment or delivery even mean? Continuous integration means that changes get merged to the master or main branch continuously. Remember Trunk-based development? In TBD, the goal is achieving continuous integration, and GitOps is one efficient way of doing so. Now, what’s the difference between deployment and delivery? Both obviously mean that we’re shipping a product. The difference is only in how the project is managed. If the code gets pushed immediately to production, then we speak of deployment. If instead the code gets pushed to a test server, and final deployment to production needs to be approved by a manager, then it’s delivery. For our purposes, this distinction doesn’t really matter. Think of delivery or deployment simply as “shipping”.
15.1 CI/CD quickstart for R programmers (and others)
Before defining a “Hello World” pipeline that gets executed in the cloud, I need to define some terms. A workflow that runs on GitHub Actions is defined as a Yaml file, and this file contains a succession of “actions”, and each action performs a specific task. Here is the simplest GitHub Actions workflow file that you could write (source: link4):
name: hello-world
on: push
jobs:
  my-job:
    runs-on: ubuntu-latest
    steps:
      - name: my-step
        run: echo "Hello World!"
This needs to be saved in a hello_world.yml file, and placed inside the .github/workflows/ directories in the GitHub repository you want this action to run each time something gets pushed to the repo.
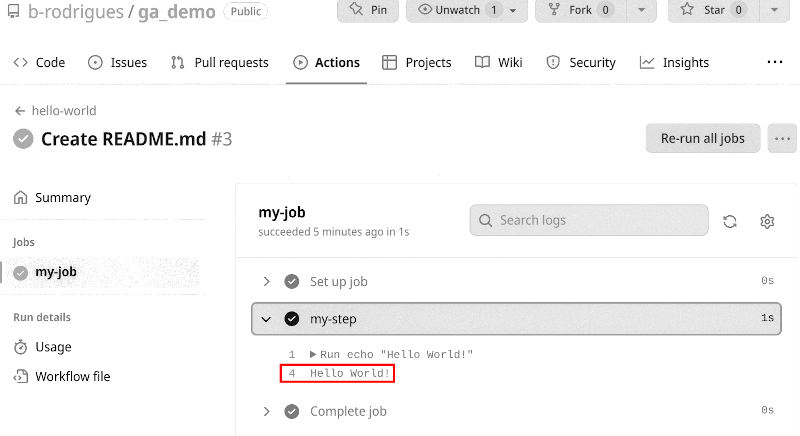
Each time code gets pushed to the repository containing this workflow file, a runner runs the code echo "Hello World!" on the latest version of Ubuntu. A workflow file is thus defined as a series of steps, that can either run code, or an action (more on actions later) that get executed on a so-called runner (in essence, a container). This workflow gets executed when a specific event occurs, in the example above that event is pushing to the repo. To see the output of the workflow, click on “Actions” on your GitHub repository:

You should see a list of workflow runs, each corresponding to a commit. Click on the latest one and then click on the job named my-job. If your workflow has multiple jobs, they’ll all be listed here. Once you click on the job, you should see a list of steps. The step that interested us here is my-step which should simply print “Hello World!”. Click on it to see the output:
To help you define complex workflows, you can use pre-defined actions that you can choose from to perform a series of common tasks. You can find them in the GitHub Actions Marketplace5.
We are not going to use any actions from the GitHub Actions Marketplace just yet though, but instead, we will be looking at a repository containing actions specifically made for R users (if you’re using another programming language, it is quite likely that you might find a repository of actions for that programming language).
This repository6 contains many actions for R users. For example, let’s say that you want to install R and run some code using GitHub Actions. Simply take a look at the setup-r7 and see how it’s used. Let me edit my hello_world.yml from before, and add one step that downloads R and prints "Hello from R!" using R:
name: hello-from-R
on: push
jobs:
my-job:
runs-on: ubuntu-latest
steps:
- name: hello-from-bash
run: echo "Hello from Bash!"
- name: checkout-repo
uses: actions/checkout@v3
- name: install-r
uses: r-lib/actions/setup-r@v2
with:
r-version: '3.5.3'
- name: hello-r
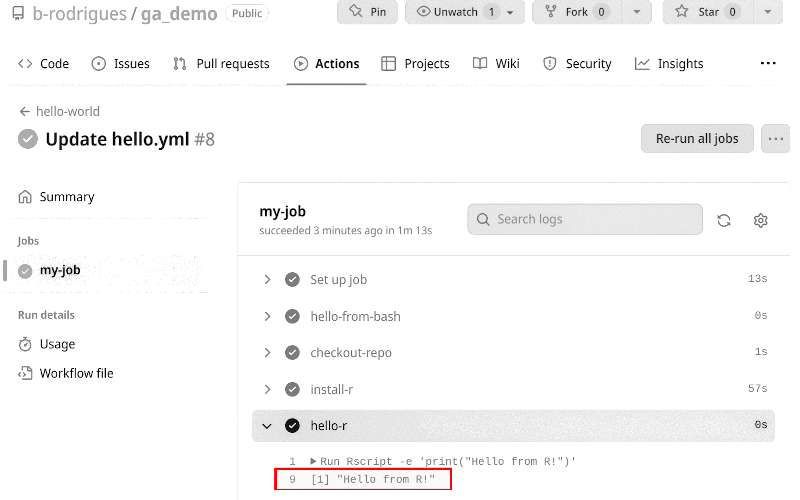
run: Rscript -e 'print("Hello from R!")'So now my job performs two tasks, one that prints "Hello from Bash!" and another that prints "Hello from R!". There are several steps involved: the second step, called checkout-repo runs the action actions/checkout@v3, and the third step, called install-r, uses the action r-lib/actions/setup-r@v2. The first action, actions/checkout@v3, is an action that you will see on almost any GitHub Actions workflow file, even though it is likely superfluous in this case. You can read about it here8 and it essentially makes the files inside the repository available to the runner. Sometimes I think that it would have made more sense to call this action clone, like the git clone command. But I’m sure there’s a very good reason that this is not the case. The next action is setup-r@v2 which downloads and installs, in our example here, R version 3.5.3. The final step then runs the command Rscript -e 'print("Hello from R!")'. If you check out the “Actions” tab on GitHub, you should now see this:
We could have installed any other version of R by the way. We can keep adding steps, for example, let’s add one to install {renv} and install packages from an renv.lock file (the file needs to be in our repository, and becomes available to the workflow thanks to actions/checkout@v3):
name: my-pipeline
on: push
jobs:
  my-job:
    runs-on: ubuntu-22.04
    steps:

      - name: checkout-repo
        uses: actions/checkout@v3

      - name: install-r
        uses: r-lib/actions/setup-r@v2
        with:
          r-version: '4.2.2'

      - name: install-renv
        uses: r-lib/actions/setup-renv@v2
I think you’re starting to see where this is going. This workflow runs on Ubuntu 22.04, installs R version 4.2.2 and installs all the packages defined in the renv.lock file stored in our repository (and if you don’t have an renv.lock file, only {renv} will get installed). So to have our RAP running in the cloud, we would simply need to add the other required files and finish writing the workflow. One note of warning though: if you’re running pipelines defined like the above, each time you push, every step will run from scratch (apart from package installation using r-lib/actions/setup-renv@v2 because packages will be cached for future runs of the workflow), and this may take some time to run.
15.2 Running a RAP using GitHub Actions
Because running {targets} pipelines on GitHub Actions is a common task, there is of course a way to do it very easily, without the need to write our own workflow file. Simply go to the folder that contains your pipeline (which, I hope, is versioned using Git, right?), open an R session and run targets::tar_github_actions(). This will automatically create a folder called .github/ in the root of your pipeline’s folder, with inside a workflows/ folder, and inside a targets.yaml workflow file. This file is ready to use, but you may adapt it to your needs. For example, this workflow file runs on ubuntu-latest and installs the latest version of R. You may want to change the version of Ubuntu to ubuntu-22.04 (this way, Ubuntu 22.04 will keep getting used even when the next LTS, 24.04, will be released) and install R version 4.2.2 (or whichever version you used for your pipeline). Also, don’t forget to install the Ubuntu dependencies under the “Install Linux System dependencies” step. There’s already some dependencies there, but you should add the others that we’ve listed in the Dockerfile (the syntax is slightly different from the Dockerfile, so pay attention to it). This workflow file also runs some other useful actions, like caching packages, so they don’t need to get re-downloaded each time you push a change to the repository!
You can see the repository with the workflow file here9. The workflow file is inside the .github/workflows/ folder here10. As I explained before, pay attention to line 29 (where I stated that the action should trigger when a change gets pushed to the branch gitops-pipeline), to line 35 where I changed the runner from ubuntu-latest to ubuntu-22.04, line 43 where I install R version 4.2.2 and finally lines 53 to 74 where I install the required Ubuntu dependencies (the same as for the Dockerfile). Don’t hesitate to use this repository as a template for your projects! The rendered HTML file is in the newly created targets-runs branch of the repository. This branch gets created automatically by the workflow and the output gets saved in there automatically.
So it turns out that running a RAP on GitHub Actions is quite easy, you only need to use targets::tar_github_actions(), and adapt the targets.yaml file a little bit to install the right version of R and run it on the right version of Ubuntu (or Windows or macOS, but careful, you only have 2,000 free minutes and Windows and macOS are more expensive than Ubuntu, 1 minute of CPU time on Ubuntu is equal to 2 minutes of run-time on macOS). By using {renv} and the generated renv.lock file, the pipeline dependencies get installed seamlessly as well. You can now focus on coding: each time you push to this branch, you will see the output get generated (and because caching is being used, runs will be executed rather quickly).
But, and yes there is a but, you should think about the following, potential, issues:
- You are limited to 2,000 minutes of free run time. If your pipeline takes several hours to run, you might need to upgrade to a paid account, or run it locally (but this is mitigated thanks to caching on GitHub and by using
{targets}that caches results as well); - GitHub Actions does not keep old versions of operating systems for too long. For example, as of writing, only versions 20.04 and 22.04 of Ubuntu are available. Ubuntu 18.04 was removed in August 2022. If your RAP absolutely needs a specific version of Ubuntu for a very long time, GitHub Actions might not be the right solution. The same is true for Windows or macOS as well. However, what you might want to do instead is migrate the pipeline to newer versions of Ubuntu when these become available. Generally speaking, this should not be a very painful process.
So you need to think about what it is you really need. Does your pipeline run relatively quickly, and you don’t need to keep it running forever on the same operating system? Then GitHub Actions is for you. Or perhaps you are writing a book using Rmarkdown, or Quarto, and don’t want to bother building it and deploying it manually? Then GitHub Actions is for you as well (and take a look at this book’s workflow file here11 for an example of exactly this). But if you are working on a pipeline that may take several hours to run, and you want it to stay reproducible for a very long time, then using Docker might be a better option. Thankfully, you can also use GitHub Actions to build Docker images and upload them to Docker Hub. You can even then run a Docker container that runs your RAP (but here again, if your pipeline takes several hours to run, you may not want to do that).
15.3 Craft a dockerized dev env with GA
This section and the next are going to mirror the sections on dockerizing projects and dockerizing dev envs (development environments) from the previous chapter. The only difference is that all the heavy lifting will happen on GitHub Actions, instead of our own computer.
I’m going to describe the following repository12. This repository contains a Dockerfile, and a .github/workflows/ folder with a GitHub Actions workflow file. Each time I push any change to any file from this repository, a new Docker image gets built automatically and pushed to Docker Hub. The image that gets built defines a dev env that we will then use for our RAPs.
As stated before, the advantage of using Docker images for your RAPs instead of simply running them directly inside GitHub Actions (as in the previous section), is that you don’t rely on GitHub to have the base image (in our example, ubuntu-22.04), forever available, which they won’t.
The idea is the same as before: work on the code of your project, define a Dockerfile and get an updated image each time you push your changes to the repository.
Let’s start with the GitHub Actions workflow file that we need. Here it is:
name: build_docker

on:
  push:
    branches:
      - master
      - main

jobs:
  docker:
    runs-on: ubuntu-latest
    env:
      IMAGE_NAME: r_4.2.2
    steps:
      - name: Setup
        uses: docker/setup-buildx-action@v2
      - name: Login to Docker Hub
        uses: docker/login-action@v2
        with:
          username: ${{ secrets.DOCKERHUB_USERNAME }}
          password: ${{ secrets.DOCKERHUB_TOKEN }}
      - name: Build image and push to Docker Hub
        uses: docker/build-push-action@v4
        with:
          tags: ${{ secrets.DOCKERHUB_USERNAME }}/${{ env.IMAGE_NAME }}:
            ${{ github.ref_name }}-${{ github.sha }}
          push: true
Just one remark: I had to split the tags: line into two lines. When copying this line into the yaml file, put the two lines back into one line. Click here13 for the actual file.
I believe that this file is the simplest one you could have for this. Let’s study it in detail.
The start of the file is pretty standard: we give the workflow a name, and state that it should run on ubuntu-latest whenever anything gets pushed to either main or master. We define an environment variable called r_4.2.2. This is the name of the image that we are going to build. We will build an image that comes with R 4.2.2 pre-installed as well as many required Ubuntu packages; it’s the same image as we built in the previous chapter on top of which we will then build RAPs. This image is based on the one from the Rocker project. We will take a look at the Dockerfile afterwards. Then, the action docker/setup-buildx-action@v2 simply sets up everything for buildx to run smoothly (buildx will build the Docker image using the docker buildx command an alternative to docker build). Honestly, I don’t even know exactly what it sets up. I guess it may at least check out the repository to make the files available to the next actions and maybe set some other variables for docker buildx.
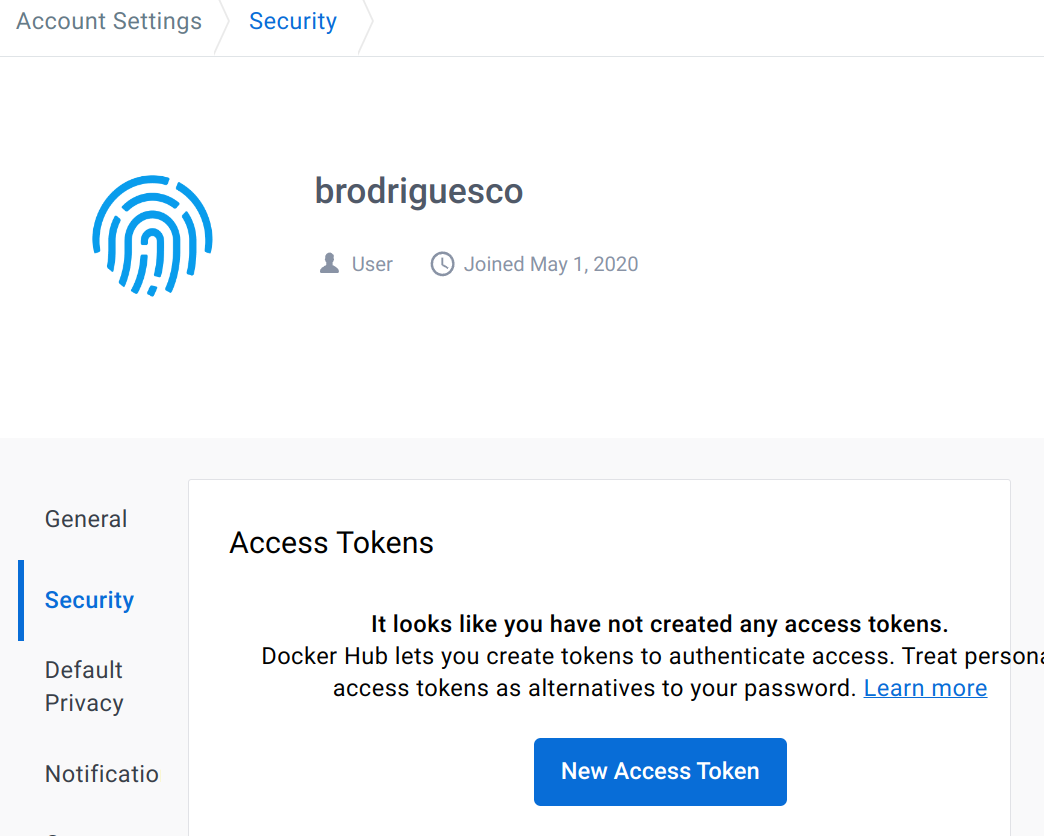
Then we use the docker/login-action@v2 to login from GitHub Actions to Docker Hub. Essentially, we need to be able to tell our GitHub Actions runner how to login to Docker Hub, and of course we want to do so in a secure manner (and it must run non-interactively). To login to Docker Hub from GitHub Actions, you need first to create an access token from your Docker Hub account. Login to your Docker Hub account, go to your account settings and then to the “Security” tab:
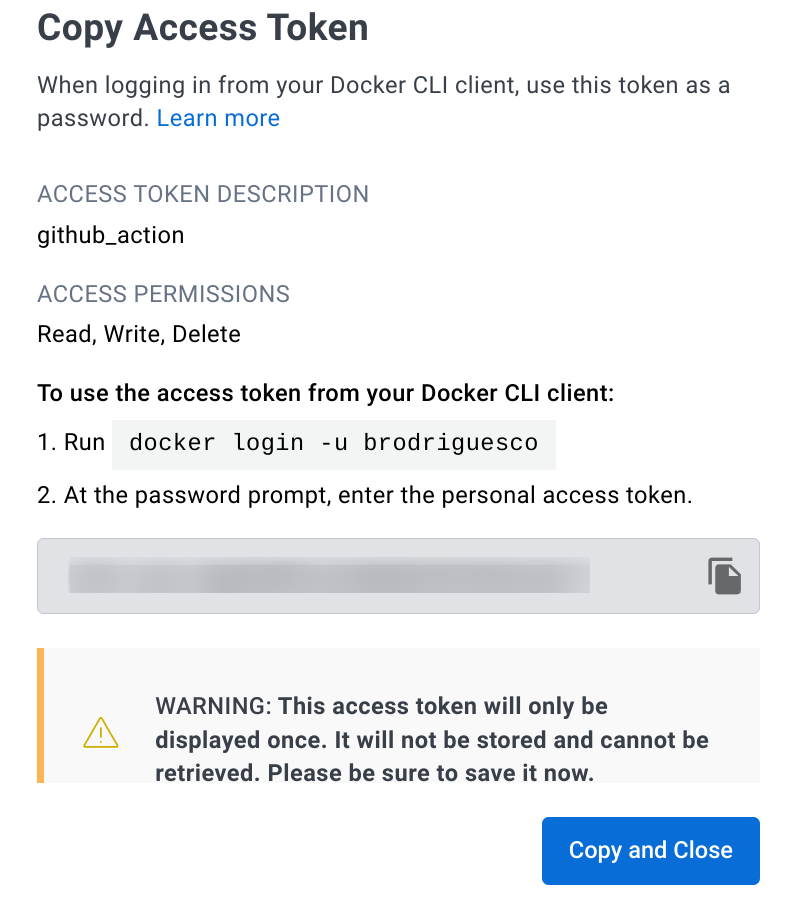
Name it github_actions for example, and set its permissions to “Read, Write, Delete”. On the next window that pops up, make sure to save your access token:
You then need to go to the settings area of the repository. Under “Security”, “Secrets and variables” and finally “Actions”, you can create a repository secret (as opposed to an environment secret) called DOCKERHUB_TOKEN and copy the value of the token in the free text area:
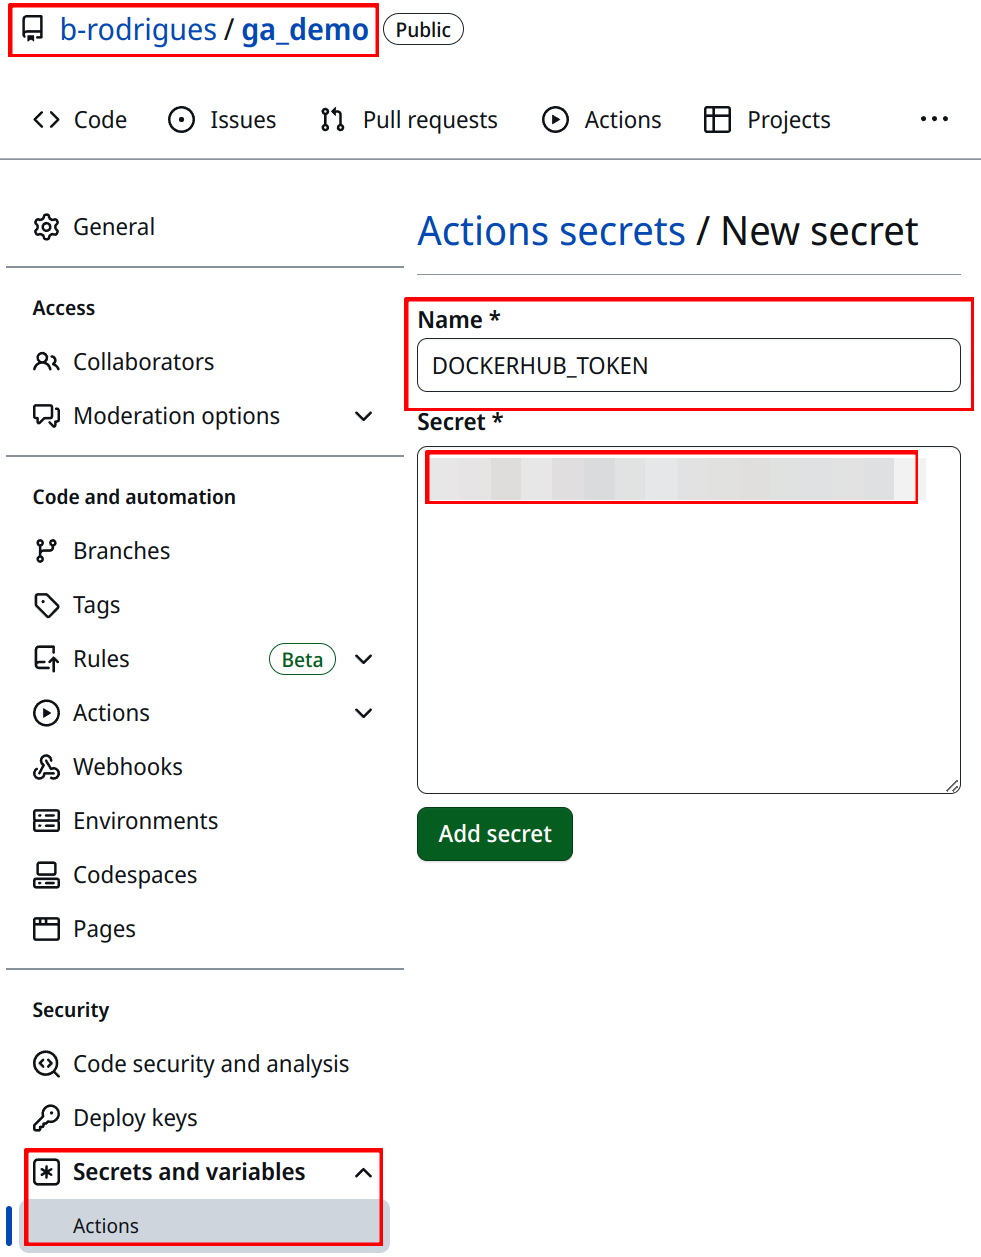
Create a second secret with your Docker Hub username called DOCKERHUB_USERNAME. These can now be used in the workflow file using so-called contexts. Your Docker Hub username will get replaced wherever you write ${{ secrets.DOCKERHUB_USERNAME }} in the workflow file, same for your Docker Hub token with ${{ secrets.DOCKERHUB_TOKEN }}.
Finally, we build and push the image to Docker Hub. This is done using the action called docker/build-push-action@v4. We use the tags option to tag our image. The tag needs to start with your username, followed by a /, then the image name, and then a version, so something like bob/r_4.2.2:latest where latest would be the latest version of the image that is available. Getting bob/r_4.2.2 is quite easy: simply use your Docker Hub username that you defined as a secret, then literally type / and then use the image name that you’ve defined in the beginning of the workflow file. Careful though: bob/r_4.2.2 needs to exist on Docker Hub as well. bob is easy, that’s your Docker Hub username as already stated, but r_4.2.2 is a repository that you need to create on Docker Hub. So both your image name and the repository name on Docker Hub will be r_4.2.2. If you don’t create a repository on Docker Hub that is exactly named like that, your image will not get pushed, because GitHub Actions will not know where to push the image. So if this is not already the case, go back to Docker Hub and create a repository named r_4.2.2. For the version, you can do whatever you want, but I suggest to use the context github.ref_name and github.sha. github.ref_name gives the name of the branch that starts the workflow, and github.sha returns the hash number of the commit that starts the workflow. This way, your image will be named something like bob/r_4.2.2:master-65ai9besta65948. This allows you to see which commit generated which image, which is really useful. We then also set push to true, so that the image gets pushed.
With this workflow file in hand, I can now build a Docker image and push it to Docker Hub simply by pushing code to my repository. Here are two commits that generated two images:
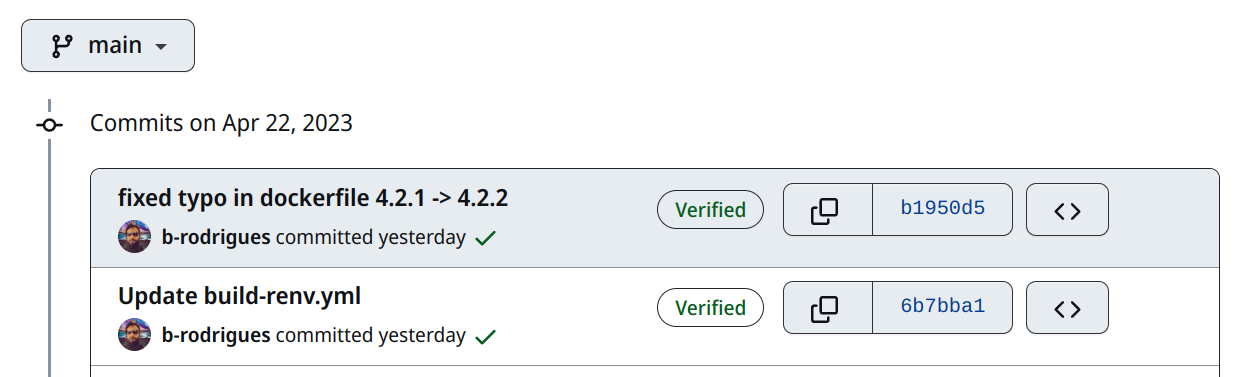
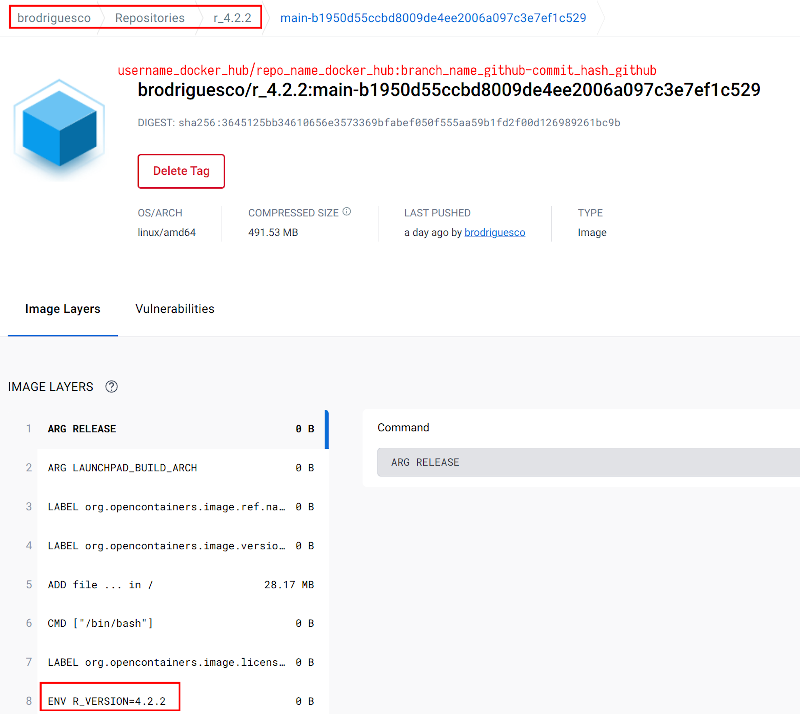
and here are the two corresponding images on Docker Hub:

I noticed a typo in my Dockerfile: originally, I was basing my image on R version 4.2.1. So I changed this and pushed. This is the commit that starts with b1950. The image then got built, tagged, and pushed to Docker Hub without any manual intervention on my part. You can see that the tag is of the form repo-hash, in this case, main-b1950d. Clicking on this tag on Docker Hub shows you some useful information:
(When running GitHub Actions, you may encounter an error complaining about permission being denied to “github-actions[bot]” and therefore being unable to access your repository. To address this problem, you may need to change the access settings of your repository to give write permission to the workflow. Under the settings area of the repository, select “Actions” then “General”, and then scroll to the bottom to the “Workflow permissions” section. Select “Read and write permissions” and then click the “Save” button. Then try running the workflow again.)
15.4 Run a RAP using a dockerized dev env on GA
Now that we have a dockerized dev env that gets built by pushing changes to a GitHub repo, it is now time to use it for our RAPs. As I wrote in the beginning, this will mirror the section on running a RAP that uses a dockerized environment, so we can start from that repository. This14 was the repository that we used at the time. You can create a new repository with the same content (but you can remove the .gitignore file, it won’t be needed here). This is what my repository15 looks like. The only difference with the first repository is the Dockerfile and the GitHub Actions workflow file that is inside .github/workflows. Let’s take a look at the Dockerfile first:
FROM brodriguesco/r_4.2.2:main-b1950d55ccbd8009de4ee2006a097c3e7ef1c529

RUN mkdir /home/housing

RUN mkdir /home/housing/pipeline_output

RUN mkdir /home/housing/shared_folder

COPY renv.lock /home/housing/renv.lock

COPY functions /home/housing/functions

COPY analyse_data.Rmd /home/housing/analyse_data.Rmd

COPY _targets.R /home/housing/_targets.R

RUN R -e "setwd('/home/housing');renv::init();renv::restore()"

RUN cd /home/housing && R -e "targets::tar_make()"

CMD mv /home/housing/pipeline_output/* /home/housing/shared_folder/
It is almost exactly the same as the one from the dockerized pipeline from the previous chapter. The only difference is the very first statement, where we pull the base image. Now I’m using the image from the dockerized environment that I built in the previous section. Apart from that, everything’s the same.
The magic happens with the workflow file. Here it is:
name: Reproducible pipeline

on:
  push:
    branches:
      - main
      - master

jobs:

  build:
    runs-on: ubuntu-latest

    steps:
    - name: Checkout repository
      uses: actions/checkout@v3

    - name: Build the Docker image
      run: docker build -t housing_image .

    - name: Docker Run Action
      run: >
        docker run --rm --name housing_container -v
        /github/workspace/shared_folder:/home/housing/shared_folder:rw
        housing_image

    - uses: actions/upload-artifact@v3
      with:
        name: housing_output_${{ github.sha }}
        path: /github/workspace/shared_folder/
By now, you should certainly understand this workflow file without much trouble. First we checkout the contents of the repository to make the files available to the other steps. Then we build the Docker image. For this, I’m doing this the “old-school” way by using the actual command that we would use on our local machine. Then we run the container. Once again I use the command that I would use locally. But you’ll notice that I use /github/workspace/shared_folder as the path to the shared folder. You likely guessed it, /github/workspace/ is the “local” path inside the GitHub Actions runner. This is equivalent to the /home/ directory on a Linux machine. The command is also on multiple lines (to write a command over multiple lines on github actions, you need to start by > and then use as many lines as you need).
The final action, actions/upload-artifact@v3 is used to upload the contents of the shared folder and name them housing_output_${{ github.sha }}, where ${{ github.sha }} will get replaced by the hash from the commit that triggered the action. This will be a zip file that you can then download. But download from where?
Simply click on the “Actions” tab on the GitHub repository, and then click on the run that you want the artifact from (pipeline outputs are called artifacts):
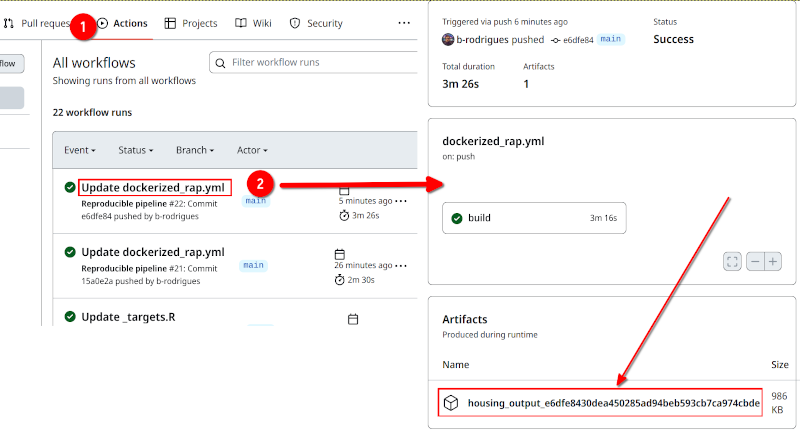
And that’s it! You could tweak the workflow file to instead push the files to a new branch in the repository, like the workflow file that targets::tar_github_actions() generates. But I think that this solution is easier to use, and also, if you need to download the artifact from a previous run, it’s all right there. Simply select a previous run and download the artifact. If instead, you push the outputs to a new branch, you’d need to revert to that commit to get past outputs.
15.5 Conclusion
At the start of this chapter, I stated that this chapter was optional, because it is not necessary to use a CI/CD service to ensure that your projects are reproducible. However, I believe that setting up your project to make it run on GitHub Actions (or any other CI/CD service) truly forces you to master all the topics presented in this book. In the conclusion of part 1 of the book, I wrote that it seemed as if functional programming was only about putting restrictions on our code, for very little gain. In some ways, forcing yourself to use a CI/CD service can feel similar. But here’s the thing: if your project builds successfully on a CI/CD service, and if the results remain stable over time, then your project is reproducible. Someone else could then run it locally by simply following the same steps as in the workflow file, which would consist of the very same basic steps: clone the repository, build a Docker image and run a container (or set up the required R package library using {renv} and then run the pipeline with {targets} if you’re not using Docker).
If you work in research, but cannot push the data to GitHub, you could always work on the code and the infrastructure using synthetic data for instance. The repository alongside the synthetic data could then be a nice complement to the paper (but again, only in case the data cannot be published).
https://www.atlassian.com/devops↩︎
https://github.com/b-rodrigues/rap4all↩︎
https://is.gd/F9AOZI↩︎
https://is.gd/9mDykY↩︎
https://github.com/marketplace↩︎
https://github.com/r-lib/actions↩︎
https://github.com/r-lib/actions/tree/v2/setup-r↩︎
https://github.com/actions/checkout↩︎
https://github.com/rap4all/housing/tree/gitops-pipeline↩︎
https://is.gd/iIJwuG↩︎
https::/is.gd/6nhYaf↩︎
https://github.com/b-rodrigues/ga_demo/tree/main↩︎
https://is.gd/0xqH22↩︎
https://github.com/rap4all/housing/tree/docker↩︎
https://github.com/b-rodrigues/ga_demo_rap↩︎