install.packages("fusen")11 Packaging your code
In this chapter, you’re going to learn how to create your own package. And let me be clear right from the start: the goal here is not to convert your analysis as a package to then get it published on CRAN. No, that’s not it. The goal is to convert your analysis into a package because when your analysis goes into package development mode, you can, as the developer, leverage many tools that will help you improve the quality of your analysis. These tools will make it easier for you to:
- document the functions you had to write for your analysis;
- test these functions;
- properly define dependencies;
- use all the code you wrote into a true reproducible pipeline.
Turning the analysis into a package will also make the separation between the software development work you had to write for your analysis (writing functions to clean data for instance) from the analysis itself much clearer. The package itself can be published on Github (if there’s nothing particularly sensitive about it) and can also be very easily installed from R itself from Github, or you can store it inside your organisation and then simply install it locally.
By turning your analysis into a package you will essentially end up with two things:
- a well-documented, and tested package;
- an analysis that uses this package like any other package.
Making this separation will then make it easier to record dependencies of your analysis using {renv}, as your package will be a package like any other that needs to be recorded. And what’s more, we can start with the .Rmd files that we have already written! The {fusen} package (Rochette 2022) will bridge the gap between the .Rmd files and the package: as Sébastien Rochette, the author of {fusen}, says:
If you have written an Rmd file, you have (almost) already written a package.
But you could just as well start directly with an empty {fusen} package template, and then start your analysis from there. Package development with {fusen} is simply writing RMarkdown code.
11.1 Benefits of packages
Let’s first go over the benefits of turning your analysis into a package once again, as this is crucial.
The main point is not to turn the analysis into a package to publish on CRAN (but you can if you want to). The point is that when you analyse data, you have to write a lot of custom code, and very often, you don’t expect to write that much custom code when starting. Let’s think about our little project: all we wanted was to create some plots from Luxembourguish houses’ price data. And yet, we had to scrape Wikipedia on two occasions, clean an Excel file, and write a test… the project is quite modest but the amount of code (and thus opportunities to make mistakes) is quite large. But, that’s not something that we could have anticipated, hence why we didn’t start the analysis by writing a package but a script (or an .Rmd) instead. But then as this script grows larger and larger, we realise that we might need something else than a simple .Rmd file and this is when we would start writing a package. Without {fusen}, we would almost need to start from scratch.
The other benefit of turning all this code into a package is that we get a clear separation between the code that we wrote purely to get our analysis going (what I called the software development part before) from the analysis itself (which would then typically consist in computing descriptive statistics, running regression or machine learning models, and visualisation). This then in turn means that we can more easily maintain and update each part separately. So the pure software development part goes into the package, which then gives us the possibility to use many great tools to ensure that our code is properly documented and tested, and then the analysis can go inside a purely reproducible pipeline. Putting the code into a package also makes it easier to reuse across projects.
11.2 {fusen} quickstart
If you haven’t already, install the {fusen} package:
{fusen} makes the documentation first method proposed by Sébastien Rochette, {fusen}’s author, simple to use. The idea is to start from documentation in the form of an .Rmd file and go from there to a package. Let’s dive right into it by starting from a template included in the {fusen} package. Start an R session from your home (or Documents) directory and run the following:
fusen::create_fusen(path = "fusen.quickstart",
                    template = "minimal")
This will create a directory called fusen.quickstart inside your home (or Documents) directory. Inside that folder, you will find another folder called dev/. Let’s see what’s inside it (I use the command line to list the files, but you’re free to use your file explorer program):
owner@localhost ➤ ls dev/

0-dev_history.Rmd  flat_minimal.Rmd
dev/ contains two .Rmd files, 0-dev_history.Rmd and flat_miminal.Rmd. They’re both important, so let me explain what they do:
flat_minimal.Rmdis only an example, a stand-in for our own.Rmdfiles. When doing actual work, we will be using the Rmd file(s) that we have written before (analyse_data.Rmdandsave_data.Rmd) instead, or if this is a fresh project, we could renameflat_minimal.Rmdand use it as a template for our analysis.0-dev_history.Rmdcontains lines of code that you typically run when you’re developing a package. For example, a line to initialise Git for the project, a line to add some dependencies, etc. The idea is to write down everything that you type in the console in this file. This leaves a trace of what you have been doing and also acts as a checklist so that you can make sure that you didn’t forget anything. You can also re-use for any other package development project.
Before describing these files in detail, I want to show you this image taken from {fusen}’s website1:
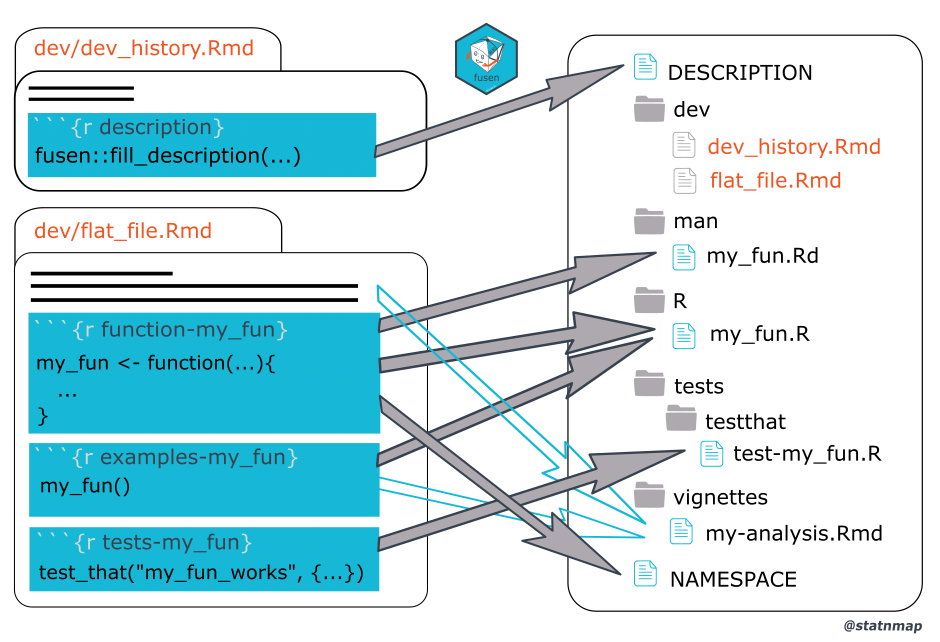
On the left-hand side of the image, we see the two template .Rmd files from {fusen}. 0-dev_history.Rmd contains a chunk called description. This is the main chunk in that file that we need to execute to get started with {fusen}. Running this chunk will create the package’s DESCRIPTION file (don’t worry if you don’t know about this file yet, I will explain). Then, the second file flat_minimal.Rmd (or our very own .Rmd files) contains functions, tests, examples, and everything we need for our analysis. When we inflate the Rmd file, {fusen} places every piece from this .Rmd file in the right place: the functions get copied into the package’s R/ folder, tests go into the tests/ folder, and so on. {fusen} simply takes care of everything for us!
But for {fusen} to be able to work its magic, we do need to prepare our .Rmd files a bit. But don’t worry, it is mostly simply giving adequate names to our code chunks. Let’s take a look at the flat_minimal.Rmd file that was just generated. If you open it in a text editor, you should see that it is a fairly normal .Rmd file. There is a comment telling you to first run the description chunk in the 0-dev_history.Rmd file before changing this one. But let’s keep reading flat_minimal.Rmd. What’s important comes next:
# my_fun

```{r function-my_fun}
#' my_fun Title
#'
#' @return 1
#' @export
#'
#' @examples
my_fun <- function() {
  1
}
```

```{r examples-my_fun}
my_fun()
```

```{r tests-my_fun}
test_that("my_fun works", {

})
```
This is a section titled my_fun. Then comes the definition of my_fun(), inside a chunk titled function-my_fun, then comes an example, inside a chunk titled examples-my_fun and finally a test in a chunk titled tests-my_fun.
This is how we need to rewrite our own .Rmd files to be able to use {fusen}, and what’s really nice is that this is essentially what we did before, but with some added structure on it. Using {fusen} just forces us to clean up our code and define examples and tests (if we want them) more cleanly and explicitly. Also, you might have noticed that in the chunk with the function definition, there are a bunch of comments that start with #'. These are {roxygen2} type comments. As the package’s documentation gets built, these comments get automatically turned into the documentation you see when you type help("my_fun") in an R console. So even the comments that you typically write to explain how your code works can be re-used to build documentation that will be much easier to browse than comments in source code!
So, basically, a {fusen}-ready .Rmd file is nothing more than an .Rmd file with some structure imposed on it. Instead of documenting your functions as simple comments, document them using {roxygen2} comments, which then get turned into the package’s documentation automatically. Instead of trying your function out on some mock data in your console, write down that example inside the .Rmd file itself. Instead of writing ad-hoc tests, or worse, instead of testing your functions on your console manually, one by one (and we’ve all done this), write down the test inside the .Rmd file itself, right next to the function you’re testing.
Write it down, write it down, write it down… you’re already documenting and testing things (most of the time in the console only), so why not just write it down once and for all, so you don’t have to rely on your ageing, mushy brain so much? Don’t make yourself remember things, just write them down! {fusen} gives you a perfect framework to do this. The added benefit is that it will improve your package’s quality through the tests and examples that are not directly part of the analysis itself but are still required to make sure that the analysis is of high quality, reproducible and maintainable. So that if you start messing with your functions, you have the tests right there to tell you if you introduced breaking changes.
Let’s go back to the template and inflate it into a package. Open 0-dev_history.Rmd and take a look at the description code chunk:
```{r description, eval=FALSE}
# Describe your package
fusen::fill_description(
  pkg = here::here(),
  fields = list(
    Title = "Build A Package From Rmarkdown File",
    Description = "Use Rmarkdown First method to build your package.
                   Start your package with documentation.
                   Everything can be set from a Rmarkdown file
                   in your project.",
    `Authors@R` = c(
      person("Sebastien", "Rochette", email = "sebastien@thinkr.fr",
             role = c("aut", "cre"),
             comment = c(ORCID = "0000-0002-1565-9313")),
      person(given = "ThinkR", role = "cph")
    )
  )
)
# Define License with use_*_license()
usethis::use_mit_license("Sébastien Rochette")
```
The fill_description() function will create the package’s DESCRIPTION file. Here2 is an example of such a file. This file provides some information on who wrote the package, the purpose of the package, as well as some metadata such as the package’s version. While developing your package, you will continuously fill in some important extra parts of this file, such that parts that list dependencies required to be able to use your package: Depends:, Imports: and Suggests:. Depends: is where you list packages (or R versions) that must be installed for your package to work (if they’re not installed, they will be installed alongside your package). This is the same with Imports:, and the difference with Depends: is most of the time irrelevant: packages listed under Depends: will not only be loaded when you load your package, but also attached. This means that the functions from these packages will also be available to the end user when loading your package. Most of the time, you do not have to list packages under Depends:. Packages listed under Imports: will only be loaded, meaning that their functions will only be available to your packages’ functions, not the end-users themselves. If that’s confusing, don’t worry too much about it, this will not be consequential for our purposes. Finally, Suggests: are dependencies that are not critical for your package to run, usually these are only necessary if you want to run the code from the package’s vignettes or examples. As you can imagine, listing the right packages under the right category can be a daunting task. But don’t worry, {fusen} takes care of this automatically for us! Simply focus on writing your .Rmd files.
The last line of this chunk runs usethis::use_mit_license(). {usethis} is a package that contains many helper functions to help you develop packages. You can choose among many licenses. Note that any open-source work should present a license so that users know how they are allowed to use it. Otherwise, theoretically, without a license, no one is allowed to re-use or share your work. You don’t need to think too much about it at the start since you can always change the license later. And if you don’t want to publish your package anywhere (not CRAN, nor Github) and keep it completely internal to your organisation, you can just define a proprietary license with usethis::use_proprietary_license("your name"). My very personal take on licenses is that you should use copyleft licenses as much as possible (so licenses like the GPL) which ensure that if others take your code and change it, their changes also have to be republished to the public under the GPL – but only if they wish to publish their changes at all. They could always keep their modifications totally private, which means that companies can, and do, use GPL’ed code in their internal products.
It’s when that product gets released to the public that the source code must be released as well. This ensures that open code stays open.
However, licenses like the MIT allow private companies to take open source and freely available code and incorporate it inside their own proprietary tools, without having to give back their modifications to the community. Some people argue that this is the true free license because anyone is then also free to use any code and they also have the liberty of not having to give anything back to the community. I think that this is a very idiotic argument, and when proponents of permissive licenses like the MIT (or BSD) get their code taken and not even thanked for it (as per the license, which doesn’t even force anyone to cite the software), and their software gets used for nefarious purposes, the levels of cope are through the roof3 (archived link for posterity). Anyway, I got side-tracked here, let’s go back to our package.
Run the code of the two functions inside the description chunk in an R console (don’t change anything for now, and make sure that the R session was started on the root of the project, so in the fusen.quickstart/ folder), and see the DESCRIPTION file appear magically in the root of the folder (as well as the LICENSE file, containing the license).
For now, we can ignore the rest of the 0-dev_history.Rmd file: actually, everything that follows the description code chunk is totally optional but still useful. If you look at them, you see that the lines that follow simply help you remember to do useful things, like initialising Git, creating a Readme file, add some usual dependencies, and so on. But let’s ignore this for now, and go to the flat_minimal.Rmd file.
Go at the end of the file, and take a look at the chunk titled development-inflate. This is the chunk that will convert the .Rmd file into a fully functioning package. This process is called inflating the .Rmd file (because a fusen is a type of origami figure that you fold in a certain way, which can then get literally inflated into a box). Run the code in that chunk, and see your analysis become a package automagically.
If you look now at the projects’ folder, you will see several new sub-folder:
R/: the folder that contains the functions;man/: contains the functions’ documentation;tests/: contains the tests;vignettes/: contains the vignettes.
Every function defined in the flat_minimal.Rmd file is now inside the R/ folder; all the documentation written as {roxygen2} comments is now neatly inside man/, the tests are in tests/, and flat_minimal.Rmd has been converted to an actual vignette (without all the development chunks). This is now a package that can be installed immediately using devtools::install(), or that can be shared on Github and installed from there. Right now, without doing anything else. You can even generate a website for your package: got back to the 0-dev_history.Rmd and check the last code chunk, under the title Share the package. Start a new, fresh session at the root of your project and run the two following lines from that last chunk:
# set and try pkgdown documentation website
usethis::use_pkgdown()
pkgdown::build_site()
This will build a website for your package using the {pkgdown} website and open your web browser and show you what it looks like. The files for this website are in the newly created docs/ folder in the root of your package folder. This can then be hosted, for free, with a service from Github called Github Pages so people can explore the package’s functions and documentation without having to install the package! Later in this chapter, I will show you how to do this.
11.3 Turning our Rmds into a package
Ok, so I hope to have convinced you that {fusen} is definitely something that you should add to your toolbox. Let’s now turn our analysis into a package, but before diving right into it, let’s think about it for a moment.
We have two .Rmd files, one for getting and cleaning the data, which we called save_data.Rmd and another for analysing this data, called analyse_data.Rmd.
In both .Rmd files, we defined a bunch of functions, but most of the functions were defined in the save_data.Rmd script. In fact, in the analyse_data.Rmd file we defined only two functions, get_laspeyeres(), the function to get the Laspeyeres price index, and make_plot(), the function to create the plots for our analysis.
We are faced with the following choice here:
- make both these
.Rmdfiles fusen-ready, and inflate them both. This would put the functions from bothsave_data.Rmdandanalyse_data.Rmdinto the inflated packageR/folder; - put all the functions into
save_data.Rmdand only inflate that file. The other,analyse_data.Rmdcan then be used exclusively for the analysis stricto sensu.
This is really up to you, there is no right or wrong answer. You could even go for another option if you wanted. It all depends on how much time you want to invest in this. If you want to get done quickly, the first option, where you simply inflate both files is the fastest. If you have more time, the last option, where you neatly split everything might be better. I propose that we go for the second option. This way, we only have to inflate one file, and in our case here, it won’t take much time anyways. It’s literally only moving two code chunks from analyse_data.Rmd to save_data.Rmd. So before continuing, let’s go back to our repository and switch back to the rmd branch that contains the .Rmd files (let’s ignore freezing packages with {renv} and thus the renv branch for now):
owner@localhost ➤ git checkout rmdUsing the rmd branch as a starting point, let’s create a new branch called fusen:
owner@localhost ➤ git checkout -b fusenSwitched to a new branch 'fusen'We will now be working on this branch. Simply work as usual, but when pushing, make sure to push to the fusen branch:
owner@localhost ➤ git add .
owner@localhost ➤ git commit -m "some changes"
owner@localhost ➤ git push origin fusen
By now, that repository should have four branches:
- master, or main with the simple
.Rscripts; - rmd, with the
.Rmdfiles - renv, containing the
.Rmdfiles as well, and therenv.lockfile - fusen, the branch we will be using now.
If you’ve skipped the first part of the book, or didn’t diligently create the branches and push, you can fork this repository4 and then clone it to start from a sane base. Switch to the rmd branch, and create a branch called fusen.
First order of business: create a {fusen} flat template in a dev/ folder. Start a fresh R session inside the housing/ folder, and run the following:
fusen::create_fusen(path = ".",
                    template = "minimal",
                    overwrite = TRUE)
Because we already have a folder for our project, called housing/ we use "." which essentially means “right here”. We need the overwrite = TRUE option because the folder exists already. Running the above command will add the dev/ folder. Move save_data.Rmd inside dev/; remember, we only want to inflate that one: analyse_data.Rmd will be a simple .Rmd that will use our package to load the needed functions and data.
Next step, move the functions get_laspeyeres() and make_plot() from analyse_data.Rmd to save_data.Rmd. Simply cut and paste these functions from one .Rmd to the other. Make sure save_data.Rmd looks something like this5, take a look at the end of the script to find the functions we’ve moved over. The analyse_data.Rmd script is exactly the same, minus the functions that we’ve just moved over.
Ok, so now, we need to make save_data.Rmd ready to be inflated. Take inspiration from the flat_minimal.Rmd that fusen::create_fusen() put in the dev/ folder. This is what the end-result should look like6 (no worries, I’m going to explain how I got there). For consistency with your future use of {fusen}, you could also rename the save_data.Rmd to flat_save_data.Rmd, although this won’t prevent {fusen} from working properly.
Let’s start with the first function, get_raw_data(). If you compare the before7, and after8, the differences are that we have named the chunk containing the function, function-get_raw_data and added documentation in the form of {roxygen2} comments. Naming the chunks is essential: this is how {fusen} knows that this chunk contains a function that should go into the R/ folder. {roxygen2} comments are strictly speaking not required, but it is highly advised that you add them: this way, your function will get documented and users (including future you) will be able to read the documentation by typing help(get_raw_data). And you’re likely already adding comments explaining what the function does anyway. Another difference is that I have made all the functions referentially transparent. Take a closer look at make_plot() in the before and after .Rmd’s. You will see that I’ve added two arguments to make_plot(), country_level_data and commune_level_data. This is really important, so don’t forget to do it!
Remember when I mentioned that the good thing about turning our analysis into a package is that it gives us a framework to develop high-quality code by using nice development tools? {roxygen2} type comments for documentation is the first such tool in this list. By commenting your functions, you explain what the inputs are, what the outputs are going to be, and also how to use the functions with some examples. Using {fusen} (and {roxygen2}), you simply continue doing the same, but with some added structure. This added structure is not costly to impose on yourself, and comes with many added benefits (in this case, free documentation!). I’m repeating myself but I really want to drive this point home: the goal is not to have to add code on top of what you already did. The point is to do what you always do, but within a framework.
Let’s now look at the functions’ {roxygen2}-type comments. The first line:
#' get_raw_data Gets raw nominal house price data from LU Open Data Portalwill create the title of the function’s help page. Then come the @param lines (in this case we only have one):
#' @param url Optional: Persistent url to the dataThis lists the parameters of the function. Here you can explain exactly what the inputs should be. What happens if the function you’re documenting has several parameters and you forget to document one? If that happens, when you will inflate the file, you will get a warning in the console that will look like this:
inflate warnings and errors: Undocumented arguments in documentation
object 'get_raw_data'
  'url'
Then come the @importFrom statements. This is where you list dependencies:
#' @importFrom readxl excel_sheets read_excel
#' @importFrom utils download.file
#' @importFrom dplyr mutate rename select
#' @importFrom stringr str_trim
#' @importFrom janitor clean_names
#' @importFrom purrr map_dfr
This is important, because the statements will write the dependencies into the package’s NAMESPACE file. This file is important, because any function defined there will be available to your package’s functions when you load the package. So if your function uses dplyr::mutate() for example, your package needs to know where to look for mutate(). This is where the NAMESPACE file comes into play. Take the opportunity to list the dependencies of your function to review them: maybe you’re using a package for a single dependency that you could easily remove. For example, I’m using stringr::str_trim() to remove whitespace around characters. But I could be using the base R function trimws() instead, which would remove this dependency. I’m going to keep it here, because I’m lazy though. It might seem like extra work to add these statements. But you have to see it this way: you are writing the functions here, once, that need to be available to your functions for them to work. The alternative is to have to write:
library("readxl")
library("utils")
library("dplyr")
library("stringr")
library("janitor")
library("purrr")
on top of each script that uses your functions. This gets old pretty fast and is error-prone. By declaring the dependencies here, you ensure that they get recorded by {renv} and will make using your project much easier.
You will also notice the following importFrom statement:
#' @importFrom utils download.filedownload.file() is included in the {utils} package, itself included with a base installation of R. So you don’t really need to specify it; but when inflating the file, you get the following message:
Consider adding
  importFrom("utils", "download.file")
to your NAMESPACE file.
hence why I’ve added it, to silence this message. Again, not mandatory, but why not do it?
Now comes the @return keyword: this simply tells your users what the function returns. If the function doesn’t return anything, because it only has a side effect (for example, writing something to disk, or printing something on screen), then you could return NULL.
#' @return A data frameLast but not least, the @export keyword:
#' @exportThis makes the function available to users that load the package using library(housing). If you don’t add this keyword, the function will be only available to the other functions of the package. Another way to see this: functions decorated with the @export keyword are public and functions without it are private. But the concept of private functions doesn’t really exist in R. You can always access a “private” function by using ::: (three times the :), as in package:::private_function().
The other functions are documented in the same manner, so I won’t comment them here. Something else you might have noticed: I replaced every %>% by the base pipe |>. You don’t have to do it, but the advantage of using the base pipe is that it removes the dependency on the {magrittr} package, needed for %>%. If you want to use %>%, you can keep it, but then should run the line:
usethis::use_pipe()in the 0-dev_history.Rmd file, which will take care of adding this dependency correctly for you (by editing the NAMESPACE file).
Next comes the test we wrote. As a reminder, here is how it looked like in our original .Rmd file:
Let’s test to see if all the communes from our dataset are represented.

```{r}
setdiff(flat_data$locality, communes)
```
The objects communes and flat_data have to obviously exist for this test to pass. This was a very simple test that must be monitored interactively. If commune names are returned here, then this means that there are communes left that we need to include in our data. But remember: we are aiming at building a RAP, and don’t want to have to look at it as it is running to see if everything is alright. What we need is a test that returns an error if it fails and which should completely halt the pipeline. So for this we use the {testthat} package, and write a so-called unit test. We’re going to deep-dive into unit testing (and assertive testing) in the next chapter, so for now, let me simply comment the test:
```{r tests-clean_flat_data}
# We now need to check if we have them all in the data.
# The test needs to be self-contained, hence
# why we need to redefine the required variables:

former_communes <- get_former_communes()

current_communes <- get_current_communes()

communes <- get_test_communes(
  former_communes,
  current_communes
)

raw_data <- get_raw_data(url = "https://is.gd/1vvBAc")

flat_data <- clean_raw_data(raw_data)

testthat::expect_true(
  all(communes %in% unique(flat_data$locality))
)
```
The first thing that you need to know is that tests need to be self-contained. This is why we define former_communes and current_communes again. The reason is that {fusen} will take this whole chunk and save it inside a script in the package’s tests/ folder. When executed, the test will run in a fresh session where the communes object is not defined. So that’s why you need to redefine every variable the test needs to run. For the test itself, we use testthat::expect_true(). This function expects a piece of code that should evaluate to TRUE: if not, we get an error, and the whole pipeline stops here, forcing us to see what’s going on. This is exactly what we want: when our code fails, it needs to fail as early and as spectacularly as possible. If you rely on future you to have to manually check console output or logs and look for errors, you deserve everything that’s going to happen to you.
Under the section titled “Functions used for analysis”, I copy-and-pasted the functions from the analyse_data.Rmd and documented them as well. What’s new is that I’ve added examples:
```{r examples-get_laspeyeres, eval = FALSE}
#' \dontrun{
#' country_level_data_laspeyeres <- get_laspeyeres_index(country_level_data)
#' commune_level_data_laspeyeres <- get_laspeyeres(commune_level_data)
#' }
```
But I don’t want these examples to run, I just want them to simply appear in the documentation. This is because, just like for tests, examples have to be self-contained. So for this example to run successfully, I would need to redefine commune_level_data from scratch. I don’t want to do this now, so hence why I wrapped the example around \dontrun and used roxygen-style comments with #'. I did the same with the function to plot the data.
We’re almost done; take a look again at the template flat_minimal.Rmd. I advised you to take inspiration from it to get save_data.Rmd fusen-ready. At the end of that file, we can see this chunk:
```{r development-inflate, eval=FALSE}
# Run but keep eval=FALSE to avoid infinite loop
# Execute in the console directly
fusen::inflate(flat_file = "dev/flat_minimal.Rmd",
               vignette_name = "Minimal")
```
This chunk contains the code that we need to run, manually, to inflate the package. However, I’ve removed it from my save_data.Rmd file, and the reason is that I prefer to have it inside the 0-dev_history.Rmd file. I think that it makes more sense to have it there. Take a look at my 0-dev_history.Rmd here9. By reading that file, you see all the different developer actions that were taken. Your team-mates, or future you could read this, and immediately understand what happened, and what was done. Under the section title “Inflate save_data.Rmd”, you see that the chunk to inflate the .Rmd file and generate the package is there. I can run this chunk from 0-dev_history.Rmd and have my package successfully generated. Something important to notice as well: my fusen-ready .Rmd file is simply called save_data.Rmd, while the generated, inflated file, that will be part of the package under the vignettes/ folder is called dev-save_data.Rmd.
When you inflate a flat file into a package, the R console will be verbose. This lists all files that are created or modified, but there is also a long list of checks that run automatically. This is the output of devtools::check() that is included inside fusen::inflate(). This function verifies that your package, once inflated, follows the rules of package development. This will likely result in some fails, warnings and notes. Your goal is to make it to 0 errors, 0 warnings, 0 notes. This will be a tricky part while developing packages, as you may not understand all outputs the first time. However, if you read the long list carefully, you will see that you are helped in many ways: position of the problems, type of problem,… Fix the problems in the flat file, and inflate again, until the number of errors is 0. I will not get deeper into this topic here, so you may want to search for check() in https://r-pkgs.org10 to go further.
I suggest that you stop here, and really try to get this working. You can start by simply cloning this repository11 I linked in the beginning of this chapter, and follow along. After inflating, take a look at the vignette generated from the inflated dev-save_data.Rmd, which you can find under the vignettes/ folder. One thing you need to understand is that the save_data.Rmd file that you inflate, under dev/, is a working file for developers. The generated vignette on the other hand, can be read by stakeholders other than developers as well. In my case, I’ve added the prefix dev- because this vignette deals with preparing data for including in the package, and there is not much point for a stakeholder other than a developer to read this vignette. You will notice that the generated vignette does not contain the function chunks. This is normal, because after inflating the .Rmd file, the functions get saved under the R/ folder. Really take some time to understand this. Because what follows will assume that you have groked {fusen}.
11.4 Including datasets
Another difference between our initial .Rmd and the fusen-ready .Rmd, is that the fusen-ready save_data.Rmd file does not save the datasets as .csv files anymore. This is because it is much better to include them directly in the package, and make them available to users by running the line:
data("commune_level_data")To include data in a package, we need the package to already be built; only once the package exists can we include data sets. This is why we need to inflate save_data.Rmd first. So, how do we include data sets in a package? If you are developing packages in the usual manner (meaning, without {fusen}) then you have to do the following steps:
- write a script that generates the data set (and save this script inside the
data-raw/folder for future reference) - save the datasets inside the
data/folder.
But we are using {fusen}, so instead, we can use the documentation first approach! And actually, the first step is done already: we have our vignette save_data.Rmd! Let’s not forget that the whole point of save_data.Rmd file was, initially, to build these datasets and save them. So why not simply re-use this vignette? If you take a look at the inflated dev-save_data.Rmd, you will see that everything is right there! That’s obvious because that was the Rmd file that we used to build the datasets in the first place. So remember, we don’t want to have to repeat ourselves. The vignette is right there with the code we need, so we are going to use it.
If you look at 0-dev_history.Rmd, everything is explained under the header “Including datasets”. The idea is to run the code inside the vignette, which creates our datasets, and then save these datasets in the right place using usethis::use_data(), mimicking the steps from “traditional” package development. In my 0-dev_history.Rmd here12, I wrapped all the code around the local() function to run all these steps inside a temporary, local environment. This way, any variable that gets made by knitting the vignette gets discarded once we’re done saving the datasets. You may need to install your package before, using remotes::install_local().
Finally, we need to document the datasets. For this, we use another .Rmd file that we inflate as well. You can find it under dev/data_doc.Rmd, or by clicking here13. Datasets get defined inside chunks, just like functions, using {roxygen2}-type comments.
This basically covers what you need to know to package code. Of course, there are many other topics that we could discuss, but for our purposes, this is enough. We now know how to take advantage of the tools that make package development easy, and have diverted them for our use. If you want to develop a proper package and push it to CRAN, then I highly recommend you read the second edition of R packages14 by Wickham and Bryan (2023). This book goes into all the nitty-gritty details of full package development. But let me be clear: this does not mean that you cannot develop a full, CRAN-ready, package using {fusen}. You absolutely can! It’s just that this is outside the scope of the present book.
11.5 Installing and sharing the package
To install the package on the same machine that you developed it, you can simply run the line remotes::install_local() on line 46 of the 0-dev_history.Rmd file (ideally in a fresh R session). But how can you share it with colleagues or future you?
Now that the package is ready, you need to be able to share it. This really depends on whether you can publish the code on Github or not, or whether your company/institution has a self-hosted version control system. In this section, we’re going to explore the following two scenarios: the package is hosted on Github (or in a private self-hosted version control system), or the package cannot be hosted for whatever reason but you still need to share the package.
11.5.1 Code is hosted
So if the code is hosted on Github (or on a self-hosted, private, version control system), users of the package can install it directly from Github. This can be done using the {remotes} package, like this:
remotes::install_github(
  "github_username/repository_name"
)
It is also possible to install the package from a specific branch:
remotes::install_github(
  "github_username/repository_name@branch_name"
)
it is even possible to install the package exactly how it was at a specific commit:
remotes::install_github(
  "github_username/repository_name@branch_name",
  ref = "commit_hash"
)
For example, if you want to install the package we have developed together from my Github account, you could run the following (the commit hash is actually wrong so you don’t install this one by mistake):
remotes::install_github(
  "rap4all/housing@fusen",
  ref = "ae42601"
)
So the package in the fusen branch and at commit “ae42601” gets installed. Keep in mind that you can specify the commit hash to install the exact version you need, because this is going to do wonders for reproducibility.
11.5.2 Code cannot be hosted
If the code cannot be hosted, then you have to share it manually. That’s less than ideal, but sometimes there simply is no alternative. In that case, you need to prepare a compressed archive that you can share. This is easily done using devtools::build(). Start a new session in the root directory of you package, and run devtools::build(). This will create a .tar.gz file that you can send to your teammates, or archive for future you. Ideally, before creating this file, you should go to 0-dev_history.Rmd and update the version number in the fusen::fill_description() function, like so:
```{r description, eval=FALSE}
fusen::fill_description(
  pkg = here::here(),
  fields = list(
    Title = "Housing Data For Luxembourg",
    Version = "0.1", # notice that I’ve added a version number here
    Description = "This package contains functions to get,
                   clean and analyse housing price data for Luxembourg.",
    `Authors@R` = c(
      person("Bruno", "Rodrigues", email = "bruno@brodrigues.co",
             role = c("aut", "cre"),
             comment = c(ORCID = "0000-0002-3211-3689"))
    )
  )
, overwrite = TRUE) # you need to add overwrite = TRUE to overwrite the file
```
You have to be very disciplined here, because you have to make sure that you keep updating this and documenting which version of the package should get used for which project. Also, make sure that you can store generated .tar.gz alongside the project and that you provide clear installation instructions. To install a package from a .tar.gz file, open a new R session and run the following:
remotes::install_local(
  "path/to/package/housing_0.0.0.9000.tar.gz"
     )
11.5.3 Marketing your work
Once your package is done, whether it is destined for CRAN or not, whether it can only be shared within your organisation or not, it is important to market it and make it discoverable. This is where building a website for the package is important, and thankfully, it takes two lines of code to build a fully functioning site. In the introduction we built the website for the template included with {fusen}, let’s now build a website for our housing package.
This website can then be hosted online if you wish, or it can be shared internally to your organisation, offline, as a means of providing documentation.
Take a look at the very last section of the 0-dev_history.Rmd file, titled “Share the package”. If you execute the lines in that chunk (ideally from a fresh R session), a website will be built automatically. You can find the website’s files in the docs/ folder: open the index.html file using a web browser and you can start navigating the documentation!
If your package is on Github, you can also host the website for free on Github pages. For this, you can build the website locally and send it to GitHub, or use GitHub Actions to build and publish it automatically.
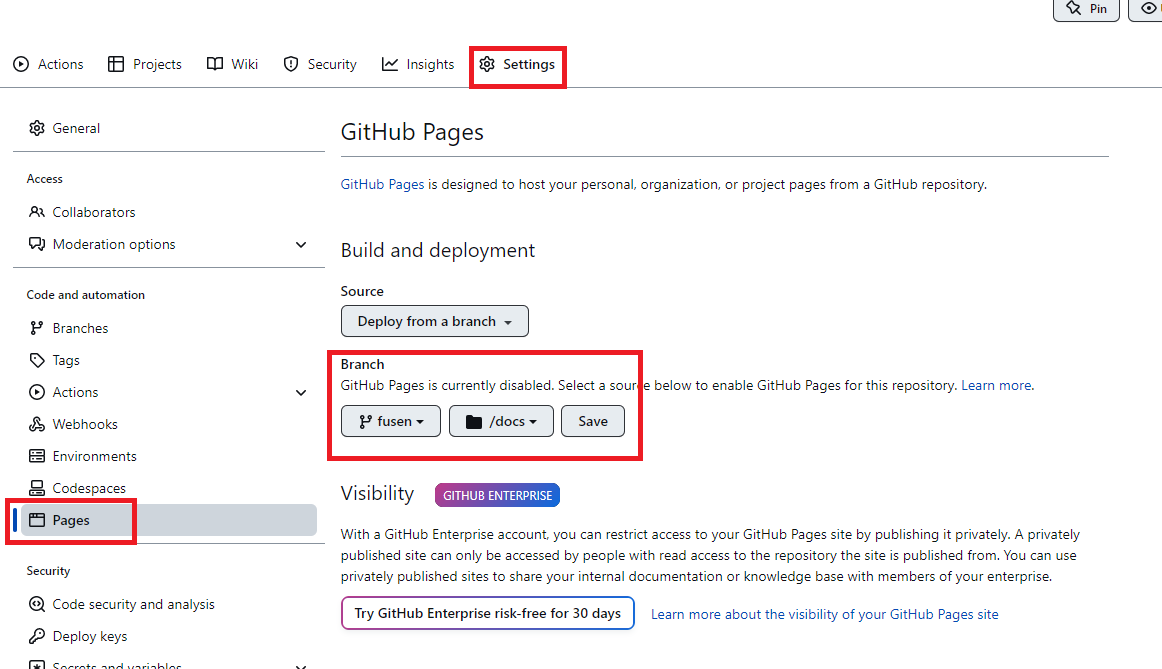
For the manual build, first make sure that the .gitignore file in the root of your package does not contain the docs/ folder. If it does, remove it. Then, commit and push. This will upload the docs/ package on Github. Then, go to the repository’s settings, and “Pages” and then choose the branch that contains the docs/ folder:
For the automatic build, first make sure that the .gitignore file in the root of your package does contain the docs/ folder, so that you do not send your local verifications. Then go to your 0-dev_history.Rmd to run:
usethis::use_github_action("pkgdown")Commit the .github/ directory with its yml files and push. GitHub Action is a service that automatically runs following instructions in the yml file, at each commit. When you commit to the main or master branch, the website will be built. As above, in the GitHub settings, you will need to define the root of the gh-pages branch to be published as GitHub Pages. This is called Continuous Integration and Continuous Deployment. Note that you may want to set the other GitHub Actions listed in the 0-dev_history.Rmd to make it check your package on a different computer than yours. There is a chapter about CI/CD later in this book.
As an example of the website, you can visit the website of the package we’ve built together here15.
The package’s README will be shown, if available, on the starting page of the website. So if you want to add a README to your package, go to the 0-dev_history.Rmd file and execute the line usethis::use_readme_rmd(), which adds a template README file in the root of your package. Regardless of whether you want to build a website, adding a README to it is always a good idea! You could explain what the main features of the package are, and how to install it, especially if you want your users or future you to install the package at a certain commit, it is quite useful to write it down clearly in the instructions. Something like:
To install this package, run the following lines of code:

```
remotes::install_github("rap4all/housing@fusen",
                        ref = "ae42601")
```
You can also include the link to your website documentation.
11.6 Conclusion
Turning our analysis into a package is useful, because we can divert a lot of tools that are originally intended for package development towards improving our analysis. We can now more easily document the code, define its dependencies, and also share it with teammates, our future selves or the world. What’s more, we clearly separate two tasks from each other: the pure software engineering part, which consisted in building the package, from the pure data analysis part, which will eventually become our pipeline.
But turning the analysis into a package is optional; this is not something that you absolutely have to do to turn your analysis reproducible. However, the entry cost of package development is really lowered thanks to {fusen} and the benefits are really great, so I think that is important to do.
There is one chapter left before we actually build a full-fledged pipeline. In the next chapter, we will learn how to use unit and assertive testing to further improve the code of our package, which will thus also improve the quality of our analysis.
https://is.gd/5pJi2h↩︎
https://is.gd/PfvkSZ↩︎
https://is.gd/PS45xu↩︎
https://is.gd/jGZrMF↩︎
https://is.gd/fusen_save_data↩︎
https://is.gd/anRjt4↩︎
https://is.gd/fusen_save_data↩︎
https://is.gd/inflate_ready_save_data↩︎
https://is.gd/JsJJVN↩︎
https://r-pkgs.org↩︎
https://is.gd/jGZrMF↩︎
https://is.gd/JsJJVN↩︎
https://is.gd/wjkNAO↩︎
https://r-pkgs.org/↩︎
https://rap4all.github.io/housing/↩︎